Deployments
Note: Only users with an Administrator role can create, edit, and delete deployments.
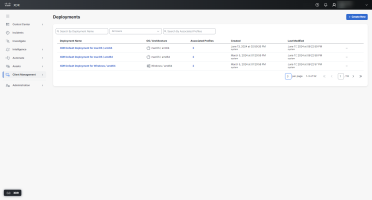
The Deployments page provides a list of all the Secure Client deployments in your Cisco XDR organization and allows users to define a list of all packages and related profiles that must be installed on all computers in a specific deployment within an organization (for example, QA department).
Choose Client Management > Deployments in the navigation menu to open the Deployments page.
The Default Deployments page shows the default deployments created for Cisco XDR, and the Custom Deployments page shows the user created deployments.
The table provides the following information:
|
Column Name |
Description |
|---|---|
|
Deployment Name |
The name of the deployment. Click the name to go to the Deployment Management page and view additional information. |
|
OS / Architecture |
The operating system and architecture for the deployment installer. |
|
Associated Profiles |
The number of associated profiles. Click to see the profiles associated with the deployment and go to the Profile Configuration page. |
|
Created |
The date and time the deployment was created, and the user that created the deployment. Note: User data might not be available for deployments created before the general availability release of Cisco XDR. |
|
Last Modified |
The date and time the deployment was last modified, and the user that modified the deployment. |
You can search and sort the deployments to narrow the display.
-
Search By Deployment Name - Enter the name of the deployment to find specific deployments.
-
Users - Click the drop-down menu to filter on users who created or modified deployments.
-
Search By Associated Profiles - Enter the name of a profile to find deployments associated with that profile.
-
Sort - You can sort the table alphabetically by deployment name or based on the by date and time the deployment was created or modified. Click the
(Sort) icon next to the column headers to sort the table in ascending or descending order.
Cisco XDR includes the XDR Default Deployment, which can be installed on your endpoints to improve detections and enrich incidents. The XDR Default Deployment is associated with two default Secure Client profiles, Cloud Management Default Profile and NVM Cloud Default Profile, and is configured to send Network Visibility Module (NVM) data to Cisco XDR. For more information on NVM, see the Network Visibility Module in Cisco XDR help topic.
Click the ![]() (Ellipsis) icon for the desired operating system and choose Network installer or Full installer to download the installer. Once the download is finished, install the deployment on your endpoints.
(Ellipsis) icon for the desired operating system and choose Network installer or Full installer to download the installer. Once the download is finished, install the deployment on your endpoints.
Once you have installed the XDR Default Deployment on your endpoints, you can view the NVM data in Secure Cloud Analytics (now part of Cisco XDR). This data is then sent to Cisco XDR where you will see incidents enriched with NVM data from Secure Cloud Analytics.
Note: You cannot edit or delete default deployments. If you want to edit a default deployment, copy the deployment and modify the copied deployment settings.
To verify and view the NVM data in Secure Cloud Analytics:
-
Log in to Secure Cloud Analytics.
-
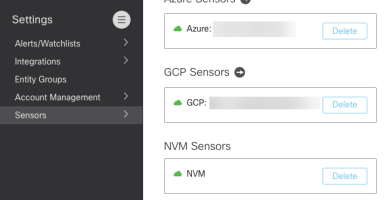
In the navigation menu, choose Settings > Sensors.
-
Scroll to the NVM Sensors section to verify Secure Cloud Analytics is receiving data from your endpoints.
-
In the navigation menu, choose Investigate > Event Viewer.
-
Click the NVM Flow tab.
The table provides the detailed telemetry collected from your endpoints with the XDR Default Deployment.
To view the Cisco XDR Incidents enriched with NVM data:
-
In Cisco XDR, click Incidents in the left navigation menu to open the Incidents page.
-
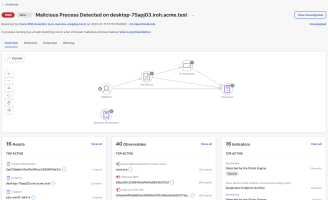
Click on an incident with Cisco XDR Analytics as the source to open the Incident drawer.
-
Click View Incident Detail.
-
On the Incident Details page, you will see the incident details enriched with the NVM data. You can also go to the Detection tab and view indicators and events from NVM data (for example, Suspicious Endpoint Activity). For more information about Cisco XDR Incidents feature, see the Incidents help topic.
You can create a new Secure Client deployment to define all packages and related profiles that must be installed on all computers in a specific deployment within an organization (for example, QA department).
Click Create New, complete the forms, and then click Save.
For more information, see the Create Deployment help topic.
To download a deployment installer for your endpoints:
-
Click the
 (Ellipsis) icon to open the Options menu. It may take some time for the menu to open.
 -
Choose Network installer or Full installer.
The download starts automatically.Note: You can also download installers from the Deployment Management page. Click the Deployment Name to open the Deployment Management page, then choose Network installer or Full installer.
For more information on downloading installers and deploying Secure Client, see the Deployment Management help topic.
To copy a deployment:
-
Click the
 (Ellipsis) icon to open the Options menu. It may take some time for the menu to open.
 -
Choose Make A Copy.
Note: You can also copy a deployment from the Deployment Management page. Click the Deployment Name to open the Deployment Management page. Click the
 (Ellipsis) icon to open the Options menu, then choose Make A Copy.
 -
The Deployment Management page opens for the copied deployment. Modify the deployment settings, if needed. For more information, see the Create Deployment and Deployment Management help topics.
To edit a deployment:
-
Click the
 (Ellipsis) icon to open the Options menu. It may take some time for the menu to open.
 -
Choose Edit Deployment.
Note: You can also edit a deployment from the Deployment Management page. Click the Deployment Name to open the Deployment Management page. Click the
 (Ellipsis) icon to open the Options menu, then choose Edit.
 -
Modify the deployment settings. For more information, see the Create Deployment help topic.
-
Click Save.
A success message is displayed in the top right corner of the screen, and the Deployment Management page opens with the updated settings.
Note: Deleting deployments is permanent and cannot be undone.
To delete a deployment from the Deployments page:
-
Click the
 (Ellipsis) icon to open the Options menu. It may take some time for the menu to open.
 -
Choose Delete.
Note: You can also delete a deployment from the Deployment Management page. Click the Deployment Name to open the Deployment Management page. Click the
 (Ellipsis) icon to open the Options menu, then choose Delete.
 -
Click Delete to confirm.
A success message is displayed in the top right corner of the screen, and the Deployments page refreshes with the deployment removed.


