Create Deployment
Note: Only users with an Administrator role can create deployments.
You use the Create Deployment page to add a new Secure Client deployment in Cisco XDR. Once the deployment is created, it is displayed on the Deployments page.
Each Version Control drop-down list typically includes these options:
Note: The options are subject to change at any time and don’t have to be consistent across the different products.
- Latest – The most recent version of the connector. It is automatically updated each time a new version is released.
- Recommended – The version with the largest user base that has been available for a while without any major issues. It is automatically updated each time a new recommended version is released.
- Specific release versions
Note: When a specific release version is deprecated, the module will automatically be disabled, and the version will appear as "N/A" on the Deployment Management page. If you have selected a specific release version that has been deprecated, you will need to edit the deployment and manually update the release version. For more information, see Deprecated Versions and EOL Schedules.
To create a new deployment:
-
Click Create New on the Deployments page.
-
Choose the operating system and architecture for the deployment, then click Create New. If you choose Linux, choose a Distribution from the drop-down list.
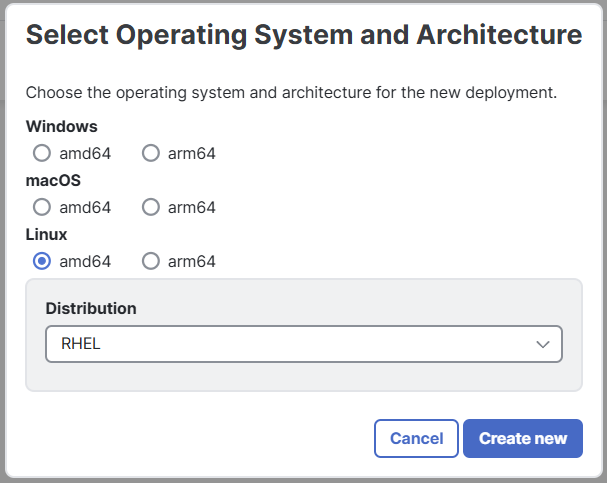
Note: The following steps may vary depending on the selected operating system and architecture. For supported modules on the selected operating system and architecture, see the Operating System and Architecture Support section.
-
Enter a deployment name, then click Next.
-
Choose the version and profile for the Cloud Management module from the drop-down lists. Cisco Cloud Management is a Cisco Secure Client module that enables cloud-driven profile and software updates. It also lets the endpoint use Cisco Secure Client Cloud Management infrastructure to manage deployments. If you need to add a new Cloud Management profile, click the
 (Add) icon to create or upload a new profile. Then click the
  (Refresh) icon to update the profile drop-down list. Click Next.
Note: If you do not specify a Cloud Management profile when creating a deployment, a profile will be generated and applied at the time of installation, in which default Cloud Management settings are used. This profile cannot be viewed or edited and is subject to change. If this is not desirable, we recommend that you create a unique Cloud Management profile to assign to deployments that don't already have one or use the Cloud Management Default Profile. For details on creating a Cloud Management profile, see the Profile Configuration help topic.
The Cloud Management module will connect to these regional API endpoints:
-
North America (NAM)
-
admin.prod.nam.csc.cisco.com
-
identify.prod.nam.csc.cisco.com
-
pacman.prod.nam.csc.cisco.com
-
cisco-ucb-nam-pass-repo.s3.us-east-1.amazonaws.com
-
cisco-ucb-nam-catalog-repo.s3.us-east-1.amazonaws.com
-
-
Europe (EU)
-
admin.prod.eu.csc.cisco.com
-
identify.prod.eu.csc.cisco.com
-
pacman.prod.eu.csc.cisco.com
-
cisco-ucb-eu-pass-repo.s3.eu-west-1.amazonaws.com
-
cisco-ucb-eu-catalog-repo.s3.eu-west-1.amazonaws.com
-
-
Asia, Pacific, Japan, China (APJC)
-
admin.prod.apjc.csc.cisco.com
-
identify.prod.apjc.csc.cisco.com
-
pacman.prod.apjc.csc.cisco.com
-
cisco-ucb-apjc-pass-repo.s3.ap-northeast-1.amazonaws.com
-
cisco-ucb-apjc-catalog-repo.s3.ap-northeast-1.amazonaws.com
-
Note: There is not an option to configure a proxy for the Cloud Management module.
-
-
Configure the optional modules that are available for the selected operating system and architecture. For each module that you want to include, click the toggle, choose the required version, profile, instance, group, or settings from the available drop-down lists and controls. To add a new profile, click the (missing or bad snippet) to upload a new profile, and then click the (missing or bad snippet) to update the profile drop-down list. Leave the toggle off for any module that you do not want to include. Once you've selected the module settings, click Next.
-
Secure Endpoint - Cisco Secure Endpoint is an Endpoint Detection & Response (EDR) module that integrates prevention, detection, threat hunting, and response capabilities. Choose the version, Secure Endpoint Instance, and Secure Endpoint Group. If you have integrated more than one Secure Endpoint organization with Cisco XDR, they’ll be listed in the Secure Endpoint Instance drop-down list. See Groups in the Secure Endpoint User Guide for information about creating and configuring a group. To edit the Secure Endpoint instance or group, click Replace Bootstrap Profile.
-
Endpoint Visibility Module - Cisco Endpoint Visibility Module (EVM) provides enhanced endpoint telemetry capture for enriched threat context and enhanced correlated detection in Cisco XDR. EVM is designed to co-exist with and complement an existing Cisco or 3rd-party endpoint security deployment with endpoint telemetry. Choose the version from the drop-down list. The Endpoint Visibility Module will connect to these regional servers:
-
Port: TCP/443
-
Protocol: HTTPS
- North America (NAM)
event-gateway.ue1.es.cisco.com
- Europe (EU)
event-gateway.ec1.es.cisco.com
- Asia, Pacific, Japan, China (APJC)
event-gateway.as2.es.cisco.com
-
-
Endpoint Data Loss Prevention - Cisco Endpoint Data Loss Prevention (Endpoint DLP) helps protect sensitive data on endpoints by controlling what data is transferred to external devices. For more information, see the Manage Endpoint Data Loss Prevention Using Cisco Secure Client documentation in the Cisco Secure Access Help.
-
Secure Client - Enables the Cisco Secure Client AnyConnect VPN functionality. You must enable this to include any optional Secure Client settings such as Umbrella or Diagnostics and Reporting Tool.
Note: By default, a VPN profile will be deployed with the name CloudManaged.xml on the device. To specify the name, append .xml to the profile name (for example, VPN_TEST.xml).
-
Secure Client settings - Depending on the operating system and module versions you chose, you can enable the Start Before Logon toggle and choose optional settings such as Umbrella, Diagnostics and Reporting Tool, ISE Posture, Secure Firewall Posture, Network Access Manager, Network Visibility Module, and Network Visibility Module - XDR.
Note: Secure Client update traffic must be excluded from Umbrella SSL Decryption, as decryption may cause certificate validation and package integrity failures.
-
Network Visibility Module - XDR collects rich flow context from an endpoint and forwards the data over a secure connection to Cisco XDR without requiring an on-premises collector.
-
The Network Visibility Module - XDR module will connect to these regional API endpoints:
- North America (NAM)
intake.prod.nam.tmc.nvmc.csc.cisco.com
- Europe (EU)
intake.prod.eu.tmc.nvmc.csc.cisco.com
- Asia, Pacific, Japan, China (APJC)
intake.prod.apjc.tmc.nvmc.csc.cisco.com
- North America (NAM)
-
-
-
Secure Client Socket Filter - Secure Client Socket Filter offers network monitoring and interception capabilities, and is required for the Zero Trust Access module on Linux deployments.
-
Secure Access Root Certificate - Installs the Cisco Secure Access Root Certificate into the host computer's certificate store. A Certificate Authority (CA) signed root certificate is required where Cisco Secure Access must proxy and decrypt HTTPS traffic that requests a web resource.
-
Zero Trust Access - If you chose AnyConnect VPN version 5.1.3.62 or later, you can enable Zero Trust Access. Zero Trust Access reduces the attack surface by hiding applications and expands your level of knowing, understanding, and controlling who and what is on your network. For more information, see the Zero Trust Access Module documentation in the Cisco Secure Client (including AnyConnect) Administrator Guide. For details on creating a Zero Trust Access profile, see the Profile Configuration help topic.
-
Orbital - Orbital provides endpoint visibility and control. It allows you to run queries and scripts to investigate and respond to threats.
Note: Secure Endpoint customers should not enable this module and should deploy Orbital through Secure Endpoint.
-
XDR Forensics - XDR Forensics provides remote data collection from endpoints, remote shell, and advanced digital forensics capabilities. If you enable this module for your deployment, you can acquire forensic data from assets within an incident. For more information, see the XDR Forensics help topic.
Note: XDR Forensics is only available for customers with Cisco XDR Advantage or Cisco XDR Premier licensing tier.
-
For information on which API endpoints the XDR Forensics module will connect to, see the Network Communication topic in the XDR Forensics Knowledge Base.
-
For information on which folders and binaries to exclude from endpoint protection solutions, see the Responder Exception Rules for EPP and EDR topic in the XDR Forensics Knowledge Base.
-
If you are installing a deployment that includes XDR Forensics on macOS devices, you will need to grant Full Disk Access permission. See the Responder Deployment topic in the XDR Forensics Knowledge Base.
Note: Every source of connection will be the Responder, the Responder does not accept any incoming traffic from the internet.
-
-
ThousandEyes - ThousandEyes delivers visibility into network and application performance across the internet and cloud. For more information, see the Endpoint Agents and System Requirements topics in the ThousandEyes documentation.
-
Duo Desktop - Duo Desktop enables device health and security posture checks at authentication, device-bound authentication without a secondary device, proximity verification with Duo Mobile, and reduced MFA prompts throughout the day with Duo Passport. For more information, see the Duo Desktop documentation.
Note: On macOS, Duo Desktop will prompt users to install a certificate after installing the module. For more information on how Admins can pre-deploy certificate for managed devices, see the Guide to Duo Desktop certificate deployment for macOS 11+ users.
-
-
When you have configured the available modules, click Save.
Once you click Save, the Deployment Management page opens, the installers are generated automatically, and you can download a full or network installer. For more information, see the Deployment Management topic.
Note: A maximum of 47 deployments can share the same profile. If you try to create a 48th deployment that uses the same profile, the deployment creation will fail with a notification that the limit was reached. We recommend that you use multiple profiles as needed.
 Operating System and Architecture Support
The following table provides a list of supported modules for each operating system, architecture, and minimum Cisco XDR licensing tier:
|
Module |
Minimum Licensing Tier Required |
Windows |
macOS |
Linux |
|||
|---|---|---|---|---|---|---|---|
|
amd64 |
arm64 |
amd64 |
arm64 |
amd64 |
arm64 |
||
|
Cloud Management |
Essential |
Yes |
Yes |
Yes |
Yes |
Yes |
Yes |
|
Secure Endpoint |
Essential |
Yes |
Yes |
Yes |
Yes |
No |
No |
|
Endpoint Visibility Module |
Essential |
Yes |
No |
Yes |
Yes |
No |
No |
|
Endpoint Data Loss Prevention |
Essential |
Yes |
No |
No |
Yes |
No |
No |
|
Secure Client |
Essential |
Yes |
Yes |
Yes |
Yes |
Yes |
Yes |
|
Secure Client Socket Filter |
Essential |
No |
No |
No |
No |
Yes |
No |
|
Secure Access Root Certificate |
Essential |
Yes |
Yes |
No |
No |
No |
No |
|
Zero Trust Access |
Essential |
Yes |
Yes |
Yes |
Yes |
Yes (RHEL 9 and Ubuntu 24 only) |
No |
|
Orbital |
Essential |
Yes |
No |
Yes |
Yes |
Yes |
No |
|
XDR Forensics |
Advantage |
Yes |
Yes |
Yes |
Yes |
No |
No |
|
ThousandEyes |
Essential |
Yes |
Yes |
Yes |
Yes |
No |
No |
|
Duo Desktop |
Essential |
Yes |
No |
Yes |
Yes |
Yes (RHEL and Ubuntu only) |
Yes (RHEL and Ubuntu only) |