Wait For Event
Use the Wait for Event activity to allow a workflow to wait for an event to occur before continuing. This is often used to force a workflow to wait for a task created with the Create Approval Request activity to be completed. This activity can also wait for events such as an Approval Task, Email, Incident, or Webhook.
-
If you want to limit how long your workflow will wait, you can set the activity Event Timeout property.
-
After the event occurs, information about the event will be available in the activity output. For example, for an approval task, the information available will include who the approver was, what response was selected, any approval message provided, and so on.
Usage
Complete the following Event Info properties to use the Wait for Event activity:
-
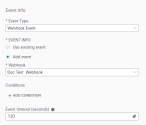
In the Event Type field, click the drop-down list and choose the type of event (Approval Task Event, Email Event, or Webhook Event).
-
Complete the relevant fields based on the Event Type that is chosen.
-
In the Event timeout (seconds) field, enter a time, in seconds, for the activity to wait before it times out.
Approval Task Event
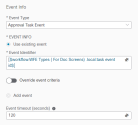
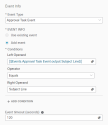
Complete the following fields for an Approval Task Event.
-
Event Type - Click the drop-down list and choose Approval Task Event.
-
Event Info - Click the Use existing event or Add event radio button.
-
Event Identifier - Click the click the Variable Reference icon and choose a variable that includes the event ID of an existing event.
Note:To create a variable that includes the Event ID of an existing event:
-
Go to the existing event that you are using and copy the Event ID from the URL (the number between the last two slashes). For example, https://<yourhostname>/orch-ui/events/01Y5TIXPL0DCR3IODEnVIMFCNe4gd57xJ3Z/
-
Create a new variable and paste the Event ID you copied from the event URL into the Description field, and then click Submit.
-
- Override event criteria - If you want to override the criteria used in the existing event, click the toggle and then click Add Condition and specify the following information. You may add multiple conditions and specify whether all or any of these conditions must or can be met.
- Property - Click the Variable Reference icon and choose the variable for the left side of the condition expression.
- Comparison - Click the drop-down list and choose the operator.
- Value - Enter the right side of the condition expression or click the Variable Reference icon and choose the variable.
-
Property - Click the Variable Reference icon and choose the variable for the left side of the condition expression.
-
Comparison - Click the drop-down list and choose the operator.
-
Value - Enter the right side of the condition expression or click the Variable Reference icon and choose the variable.
If you selected Use existing event, specify the following:
If you selected Add event, click Add Condition and specify the following information. You may add multiple conditions and specify whether all or any of these conditions must or can be met.
Email Event
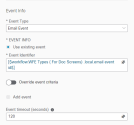
Complete the following fields for an Email Event.
-
Event Type - Click the drop-down list and choose Email Event.
-
Event Info - Click the Use existing event or Add event radio button.
- Event Identifier - Click the click the Variable Reference icon and choose a variable that includes the event ID of an existing event. Note:
To create a variable that includes the Event ID of an existing event:
Go to the existing event that you are using and copy the Event ID from the URL (the number between the last two slashes). For example, https://<yourhostname>/orch-ui/events/01Y5TIXPL0DCR3IODEnVIMFCNe4gd57xJ3Z/
Create a new variable and paste the Event ID you copied from the event URL into the Description field, and then click Submit.
- Override event criteria - If you want to override the criteria used in the existing event, click the toggle and then click Add Condition and specify the following information. You may add multiple conditions and specify whether all or any of these conditions must or can be met.
- Property - Click the Variable Reference icon and choose the variable for the left side of the condition expression.
- Comparison - Click the drop-down list and choose the operator.
- Value - Enter the right side of the condition expression or click the Variable Reference icon and choose the variable.
-
Action - Click the drop-down and choose the action that should be taken when the event occurs:
-
Delete - For POP3, all emails are downloaded and then deleted on the mail server (Inbox). You can set up the same email account using IMAP if you want to still access and manage emails on other devices using IMAP.
Warning: If you choose Delete without specifying any conditions, any emails received in the inbox of the target being monitored by the Wait for Event activity will be automatically deleted.
-
Read (Mark as Read) - Marks the emails as read but does not delete them from the mail server (Inbox).
-
-
Folder - Read only. The default setting is Inbox and cannot be changed.
-
Download Attachments - The check box is checked by default and all attachments to the email will be downloaded. If you do not want the attachments downloaded, uncheck the check box. The maximum size for downloads is 4 MB total (message and attachments).
-
Target ID - Click the drop-down and choose the target. We recommend that you choose an existing IMAP, POP3, or Microsoft Graph Endpoint target type.
-
Conditions - Click Add Condition and specify the following information. You may add multiple conditions and specify whether all or any of these conditions must or can be met.
-
Property - Click the Variable Reference icon and choose the variable for the left side of the condition expression.
-
Comparison - Click the drop-down list and choose the operator.
-
Value - Click the Variable Reference icon and choose the variable for the right side of the condition expression.
-
If you selected Use existing event, specify the following:
If you selected Add event, specify the following:
Note: Automation only supports email targets with OAuth 2.0 authentication.
Incident Event
Complete the following fields for an Incident Event.
-
Event Type - Click the drop-down list and choose Incident Event.
-
Event Info - Click the Use existing event or Add event radio button.
-
Event Identifier - Click the click the Variable Reference icon and choose a variable that includes the event ID of an existing event.
Note:To create a variable that includes the Event ID of an existing event:
-
Go to the existing event that you are using and copy the Event ID from the URL (the number between the last two slashes). For example, https://<yourhostname>/orch-ui/events/01Y5TIXPL0DCR3IODEnVIMFCNe4gd57xJ3Z/
-
Create a new variable and paste the Event ID you copied from the event URL into the Description field, and then click Submit.
-
- Override event criteria - If you want to override the criteria used in the existing event, click the toggle and then click Add Condition and specify the following information. You may add multiple conditions and specify whether all or any of these conditions must or can be met.
- Property - Click the Variable Reference icon and choose the variable for the left side of the condition expression.
- Comparison - Click the drop-down list and choose the operator.
- Value - Enter the right side of the condition expression or click the Variable Reference icon and choose the variable.
-
Property - Click the Variable Reference icon and choose the variable for the left side of the condition expression.
-
Comparison - Click the drop-down list and choose the operator.
-
Value - Enter the right side of the condition expression or click the Variable Reference icon and choose the variable.
If you selected Use existing event, specify the following:
If you selected Add event, click Add Condition and specify the following information. You may add multiple conditions and specify whether all or any of these conditions must or can be met.
Webhook Event
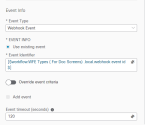
Complete the following fields for a Webhook Event.
-
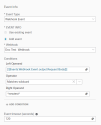
Event Type - Click the drop-down list and choose Webhook Event.
-
Event Info - Click the Use existing event or Add event radio button.
- Event Identifier - Click the click the Variable Reference icon and choose a variable that includes the event ID of an existing event. Note:
To create a variable that includes the Event ID of an existing event:
Go to the existing event that you are using and copy the Event ID from the URL (the number between the last two slashes). For example, https://<yourhostname>/orch-ui/events/01Y5TIXPL0DCR3IODEnVIMFCNe4gd57xJ3Z/
Create a new variable and paste the Event ID you copied from the event URL into the Description field, and then click Submit.
- Override event criteria - If you want to override the criteria used in the existing event, click the toggle and then click Add Condition and specify the following information. You may add multiple conditions and specify whether all or any of these conditions must or can be met.
- Property - Click the Variable Reference icon and choose the variable for the left side of the condition expression.
- Comparison - Click the drop-down list and choose the operator.
- Value - Enter the right side of the condition expression or click the Variable Reference icon and choose the variable.
-
Property - Click the Variable Reference icon and choose the variable for the left side of the condition expression.
-
Comparison - Click the drop-down list and choose the operator.
-
Value - Enter the right side of the condition expression or click the Variable Reference icon and choose the variable.
If you selected Use existing event, specify the following:
If you selected Add event, click Add Condition and specify the following information. You may add multiple conditions and specify whether all or any of these conditions must or can be met.
