Incident Response Rule
An Incident Response rule causes a workflow that you associate with it to be executed when Cisco XDR notifies Automation of a new incident with a priority score and both prioritization and enrichment are complete.
Adding a condition would enable you to evaluate particular incident criteria, and if the condition is met, the associated workflow would be executed in response.
Create New Incident Response Rule
Perform the following steps to create a new Incident Response rule:
-
In the General section, enter the following information:
-
Type - Incident Response Rule
-
Title - A unique display name for the rule.
-
Description - Text that describes the rule, such as what it will trigger.
-
-
The toggle is switched to on by default, so when left on, the rule is enabled and the workflow can be executed by it. If you want to create the rule but prevent it from triggering your workflow to run, switch the Automation rule is on toggle off to disable the rule - disabling it can be useful for testing and debugging purposes.
-
Under Create as priority or standalone rule:
-
Priority Rule - Selected by default, this option allows this rule to be arranged in order of precedence with other prioritized incident rules. Then this rule will be added to the Priority Incident Rules table and placed in the last position of the rule order. You can change the order of the rules later, as needed.
-
Stop processing subsequent rules - If you don't want to process any rules listed under this rule in the priority group, switch this toggle on (default). Switch off to disable, which means all lower priority rules will also be processed.
-
Standalone Rule - If you don't want to assign a priority to this rule in relation to other rules of the same type, select this option. Then this rule will be added to the Standalone Incident Rules table.
-
-
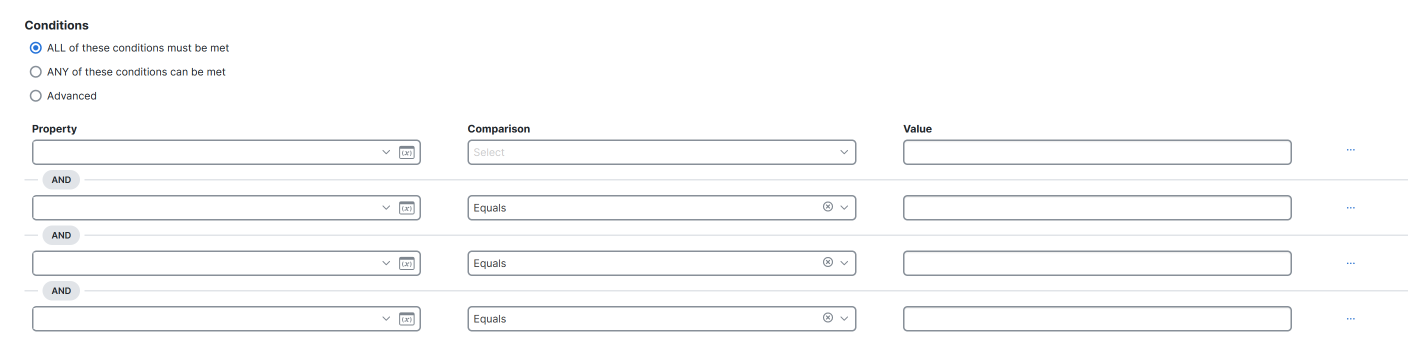
In the Conditions section, one condition is added by default with its Status property set to match all new incidents. You can adjust this value as needed (see available statuses in the Incidents topic). When an incident's status changes, the system will again check all of your incident rules and trigger those that match the specified condition(s) to execute their associated incident response workflows. If this status condition specifying the status value is deleted, the rule gets triggered by any incident status change.
-
Click Add Condition to configure additional conditions. Only if they're met will the workflow(s) you associate with this rule be executed.
-
Property - Click the variable browser icon and choose the variable to specify matching criteria based on incident metadata. For more information, such as what values are allowed, see Incident Object.
-
Comparison - Click the drop-down list and choose the operator.
-
Value - Click the drop-down list or enter the desired value, depending on the data type.
You can click the
 (Ellipsis) icon and either reset or delete a condition.
 -
-
If you add more than one condition, choose one of the following options:
-
ALL of these conditions must be met - The workflow will be triggered only if every condition is met (logical AND operator).
-
ANY of these conditions can be met - The workflow will be triggered if any of the conditions is met (inclusive OR operator).

-
Advanced - Click the operator drop-down to choose any combination of operators, in which case, it's processed sequentially, top-to-bottom.
For example: {[(condition1 AND condition2) OR condition3] AND condition4}

-
-
Configure a workflow to associate with this rule.
-
In the Apply to selected workflows section, click the Select workflow drop-down and select a valid workflow or enter its name.
-
Only a non-atomic workflow can be associated to the rule directly; custom and system atomic workflows cannot.
-
The most relevant workflows to this type of rule are shown starting at the top of the drop-down list.
-
Out-of-box XDR system workflows are prefixed with a Cisco icon. For example, XDR - Automation Rule - Update Incident Properties can be used to update fields in the incident such as Status and Assignee(s).
-
-
Depending on the workflow, enter the parameter data as needed. If the workflow has input variables, you can click the variable browser icon and select event input/output variables, which enable you to provide trigger-related values to the input variables as a reference.
-
To delete a workflow, click the
 (Trash Can) icon next to it.
 -
By default, the workflow is on and enabled. To disable it, click the toggle switch to off.
-
-
To include additional workflows, click Add another workflow.
-
Multiple workflows will be executed in parallel, not sequentially.
-
To delete a workflow, click the
(Trash Can) icon next to it. -
If you delete a workflow from here, the actual workflow itself does not get deleted, only its association with this rule is removed. In the workflow's properties, this rule would no longer appear as a trigger.
-
-
Click Save, and a trigger for this rule is automatically added to the associated workflow (see Workflow Properties).