Cisco Meraki Integration
Cisco Meraki provides cloud-managed IT solutions, from networking appliances to endpoint management, and allows you to expand globally by deploying networks quickly via simple configuration and meet the changing demands of your business without compromising reliability or security. When you integrate Meraki with Cisco XDR, you will get enhanced network detections using Meraki telemetry, enriched endpoint details, and incidents published in the Cisco XDR portal and Meraki dashboard.
Cisco XDR ingests IPFIX netflow records and Meraki meta data, including organization, network, and node serial number. This data is then used for detection analytics and correlation to create incidents. Cisco XDR also ingests Meraki AMP and IDS engine events, such as malware alerts and indicators of compromise, with support for additional event types planned for future releases.
For an overview of the integration and configuration steps, view the click-through Cisco XDR and Meraki MX Demo.
Note: If you have configured the Cisco Meraki integration with Cisco XDR, you should not install Cisco Telemetry Broker or an ONA sensor to avoid duplicate observations and alerts.
 Configure Cisco Meraki Integration
-
Ensure that you are a full Organization Admin in Meraki and that you are logged in as an Administrator in Cisco XDR.
-
In the Cisco XDR navigation menu, choose Administration > Integrations.
-
On the Integrations page, click the Cisco tab and navigate to the Cisco Meraki integration.
-
Click Enable. The Meraki sign-on page is displayed.
-
In the Meraki dashboard, enable the Cisco XDR Integration and select your Cisco XDR tenant region. Then configure the Meraki networks to send telemetry to Cisco XDR. For more information, see the Cisco Meraki and Cisco XDR User Guide.
-
Verify the Meraki integration is listed in the My Integrations panel on the Cisco XDR Integrations page.
Note: If you had previously configured Meraki in Cisco XDR, we recommend deleting the old Meraki module when configuring the new Cisco Meraki module to avoid duplication of data.
View Meraki Data
To verify the Meraki data in Secure Cloud Analytics (now part of Cisco XDR):
-
Log in to Secure Cloud Analytics.
-
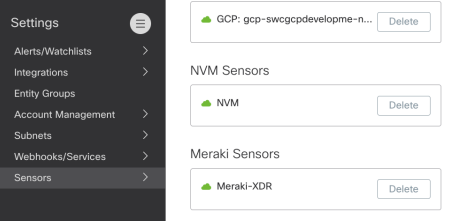
In the navigation menu, choose Settings > Sensors.
-
Scroll to the Meraki Sensors section to verify Secure Cloud Analytics is receiving data from Meraki.
To view the Meraki data in Cisco XDR:
-
In the Cisco XDR navigation menu, choose Investigate > Activities.
-
In the Filters drawer, check the Cisco Meraki check box in the Activity source drop-down list to view the detailed telemetry collected by your sensors.
Note: Depending on your network configuration, Secure Cloud Analytics may not see public IP addresses. Public IPs that need to be monitored should be explicitly added using the Settings > Subnets > On-Premises page. For more information, see the Secure Cloud Analytics Subnet Configuration Guide.
View Incidents in Cisco XDR
Incidents are groups of correlated events generated using data ingested from your integrated products. By correlating events which could be part of a larger threat into an incident, it reduces the time typically required to investigate individual security alerts or detections. For more information about Cisco XDR Incidents feature, see Incidents.
When you enable the Cisco Meraki integration, Cisco XDR ingests the telemetry and detections that are sent by Cisco Meraki and uses them for incident correlation.
To view incidents with Meraki telemetry data:
-
In the Cisco XDR navigation menu, choose Incidents.
-
Select an incident with the XDR Network source and endpoint data, and open the Incident Detail page.
-
On the Detection tab, click on the pivot menu to view the Asset endpoint attributes with the XDR Network source. You should see the Meraki metadata, including meraki_network_id.

To view incidents with Meraki detections:
-
In the Cisco XDR navigation menu, choose Incidents.
-
Look for Cisco Meraki in the Source column to find incidents generated with Cisco Meraki detections.
-
Select an incident and open the Incident Detail page.
-
Click on the Detection page to see events from Cisco Meraki and other sources.
To verify that Cisco XDR is receiving Cisco Meraki data when no incidents are present, go to the Incidents > Detections page and filter the table by Cisco Meraki using the Source drop-down list. For more information, see the Detections help topic.
Cisco XDR Asset Gaps for Meraki Devices
When Cisco Meraki is integrated with Cisco XDR, Meraki Network Clients can appear differently in Cisco XDR Devices and Incidents, depending on the Meraki MX client tracking method and network topology. Cisco XDR inherits the same client visibility, and visibility gaps, which you see in the Meraki Dashboard. If Meraki cannot identify the original endpoint, Cisco XDR cannot correct that endpoint context when it receives Meraki device records.
Review your Meraki client tracking and network topology to verify which of the following scenarios may impact how your Meraki Network Clients appear in Cisco XDR.
Review Meraki Client Tracking
Note: If your Meraki environment consists of only one Layer 3 device to which all clients are connected through Layer 2 switches, and Meraki client tracking is set to Track by MAC, there are no expected visibility gaps for those clients. The Layer 3 device can dynamically and accurately discover the IP and MAC addresses of all connected clients, as well as their operating system characteristics and more.
Meraki client tracking controls how the MX appliance identifies clients in the Meraki Dashboard, and affects Meraki device records in Cisco XDR. if your Meraki environment consists of multiple Layer 3 devices (for example, router or switch), or you have configured Track by IP, then client discovery may be limited and sometimes inaccurate for some clients.
For Cisco XDR, this can impact:
-
How Meraki clients appear in the Cisco XDR device inventory.
-
Whether individual endpoints are represented accurately.
-
Whether multiple clients are grouped under a routing device.
-
Whether device records are duplicated after a tracking method change.
-
Whether MAC address, IP address, and hostname are consistent.
The following tracking methods affect Meraki Network Clients in Cisco XDR:
-
Track by MAC - Meraki identifies clients by MAC address.
-
Track by IP - Meraki identifies clients by IP address.
To verify your Meraki client tracking configuration, see Client-Tracking Options in the Cisco Meraki documentation.
Note: Meraki also supports Unique client identifier in specific Meraki Layer 3 device topologies. Use the Meraki documentation to determine whether that method is available and appropriate for your network.
Track by MAC
When Track by MAC is enabled, the Meraki MX expects clients to be one Layer 2 hop away. In this topology, the MX can learn each client's MAC address, IP address, operating system characteristics, and other client details from traffic it observes.
The Meraki MX will accurately provide information about these directly connected Layer 2 clients and there is no adverse Cisco XDR impact. However, when a Layer 3 device is positioned between the Meraki MX and one or more clients, the MX will see all traffic from those clients with the MAC address of the intermediate Layer 3 device (the router). Essentially the Meraki MX will be tracking all this traffic as one client with the router’s MAC address. This one client may appear to have different operating systems over time (depending on which client’s traffic is observed), and various IP addresses (depending on which client’s traffic is observed).
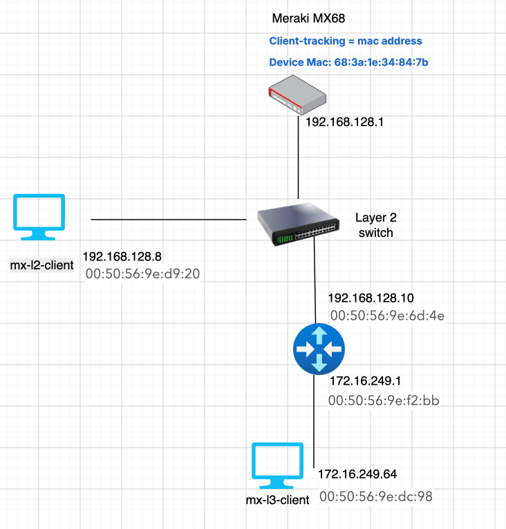
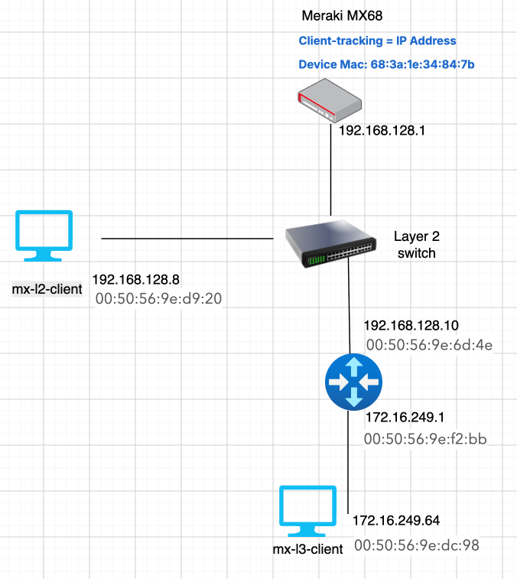
These inaccuracies are inherited by Cisco XDR, and it too will track a single client with attributes changing over time. The following diagram provides an example of a Layer 2 and Layer 3 network topology with client tracking configured to Track by Mac:
Clients Visible at Layer 2
If a client is connected to the MX through Layer 2 switching, Meraki can identify the endpoint by the client's original MAC address. Cisco XDR creates a Meraki Network Clients device record for the endpoint.
-
Individual endpoints appear as separate devices.
-
Client activity is attributed to the endpoint that generated the activity.
-
The device hostname, IP address, and MAC address represent the endpoint visible to the MX.
-
Device inventory reflects the number of clients visible to the MX.
Example: Track by MAC with a Layer 2 Client
In this example, mx-l2-client is connected to the Meraki MX68 through a Layer 2 switch:
mx-l2-client > Layer 2 switch > Meraki MX68
The client has IP address 192.168.128.8 and MAC address 00:50:56:9e:d9:20. Because the Layer 2 switch forwards Ethernet frames without routing them, the MX can see the client's original MAC address. With Track by MAC enabled, Meraki identifies the endpoint by 00:50:56:9e:d9:20.
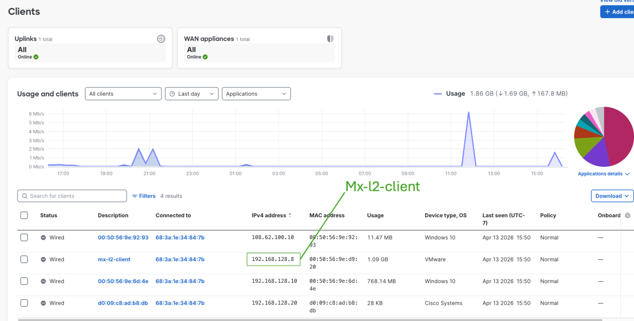
Cisco XDR creates a Cisco Meraki (Network Clients) device record that represents the endpoint. The record can include values such as:
-
description: mx-l2-client
-
ip: 192.168.128.8
-
macAddresses: 00:50:56:9e:d9:20
-
internalIpAddresses: 192.168.128.8
-
manufacturer: VMware
-
recentDeviceConnection: Wired
-
recentDeviceMac: 68:3a:1e:34:84:7b
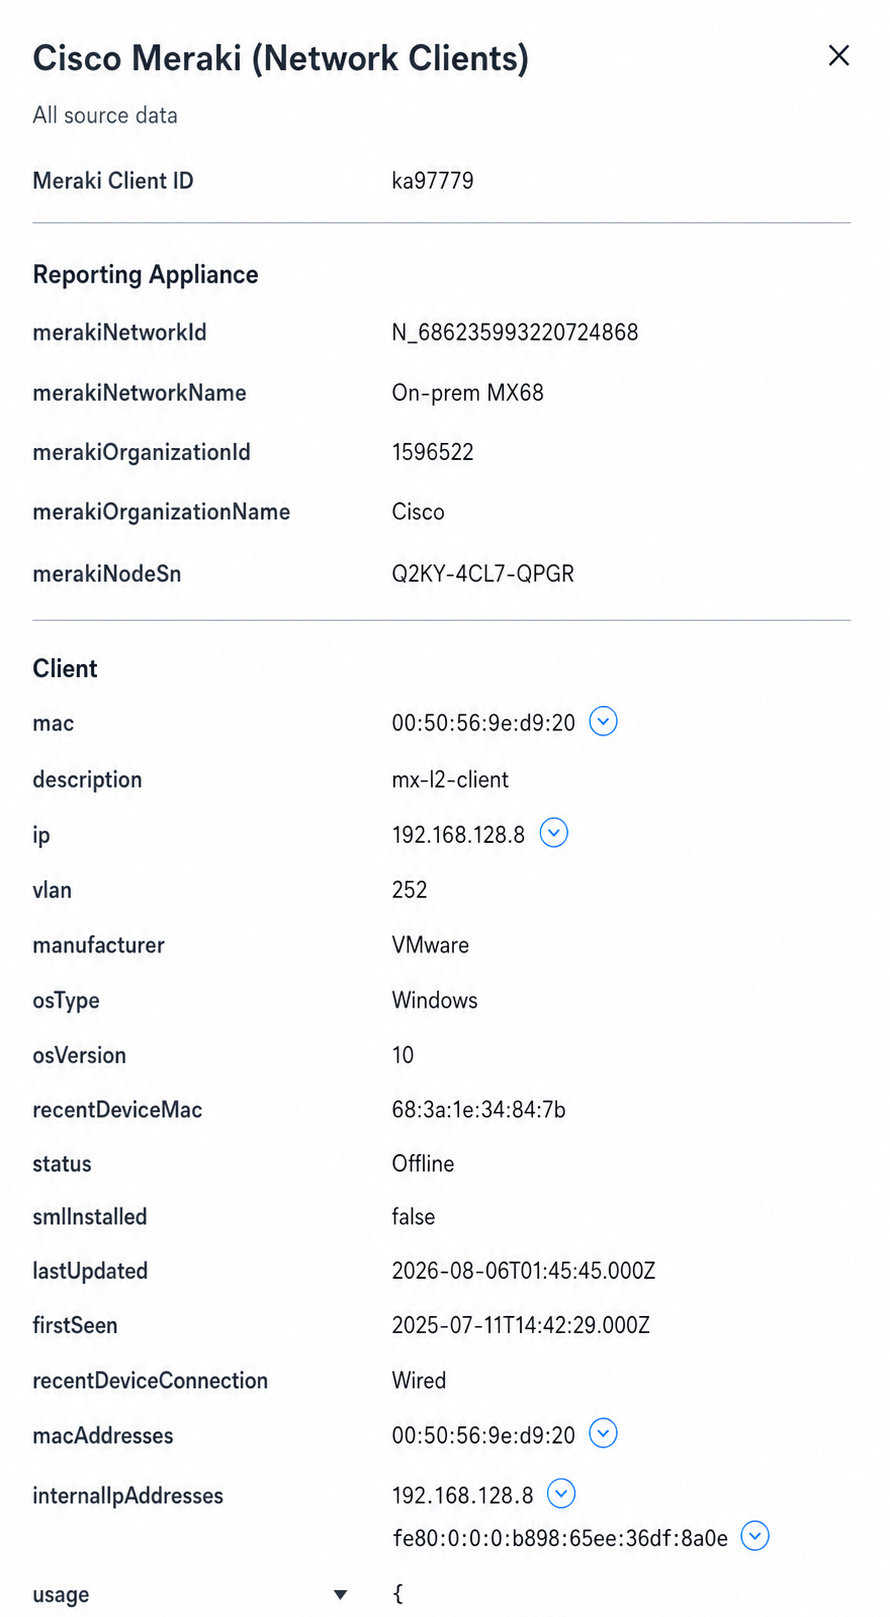
The recentDeviceMac value identifies the Meraki MX associated with the observation. The macAddresses value identifies the client.
Cisco XDR representation and impact:
-
The endpoint appears as an individual device.
-
The device hostname, IP address, and MAC address represent mx-l2-client.
-
Client activity is attributed to the correct endpoint.
-
Endpoint context accurately represents the device generating the activity.
-
The device inventory accurately reflects the client visible to the MX.
Clients Behind a Layer 3 Device
If a Layer 3 switch or router is positioned between the MX and one or more clients, the MX sees traffic from those clients with the MAC address of the intermediate Layer 3 device. Meraki tracks that traffic as one client with the router interface MAC address.
Cisco XDR inherits this behavior. The Meraki device record can represent the Layer 3 device visible to the MX instead of the downstream endpoint that generated the activity.
-
Multiple endpoints behind the Layer 3 device can appear as a single asset.
-
Client activity can be attributed to the Layer 3 device.
-
The downstream endpoint IP address and MAC address may not appear in the Meraki device record.
-
Operating system, manufacturer, and device type can be misleading if Meraki associates observed traffic with the Layer 3 device identity.
-
Device inventory can under-represent the number of actual endpoints behind the Layer 3 device.
Example: Track by MAC with Clients Behind a Layer 3 Device
In this example, mx-l3-client is behind a Layer 3 device that routes traffic toward the Meraki MX68:
mx-l3-client > Layer 3 device > Layer 2 switch > Meraki MX68
The endpoint has IP address 172.16.249.64 and MAC address 00:50:56:9e:dc:98. The Layer 3 device facing the MX network has IP address 192.168.128.10 and MAC address 00:50:56:9e:6d:4e.
When the Layer 3 device forwards traffic toward the MX, it replaces the original Layer 2 source MAC address with the MAC address of its upstream interface. With Track by MAC enabled, Meraki associates traffic from clients behind the Layer 3 device with the routing interface.
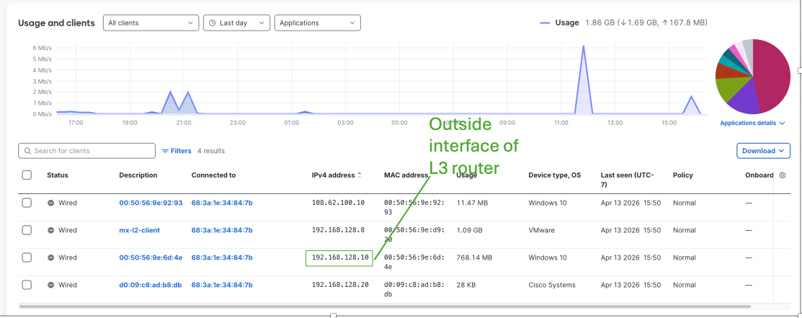
Cisco XDR creates a Cisco Meraki (Network Clients) device record that represents the Layer 3 device visible to the MX. The record can include values such as:
-
ip: 192.168.128.10
-
macAddresses: 00:50:56:9e:6d:4e
-
internalIpAddresses: 192.168.128.10
-
manufacturer: VMware
-
osType: windows
-
osVersion: 10
-
recentDeviceConnection: Wired
-
recentDeviceMac: 68:3a:1e:34:84:7b
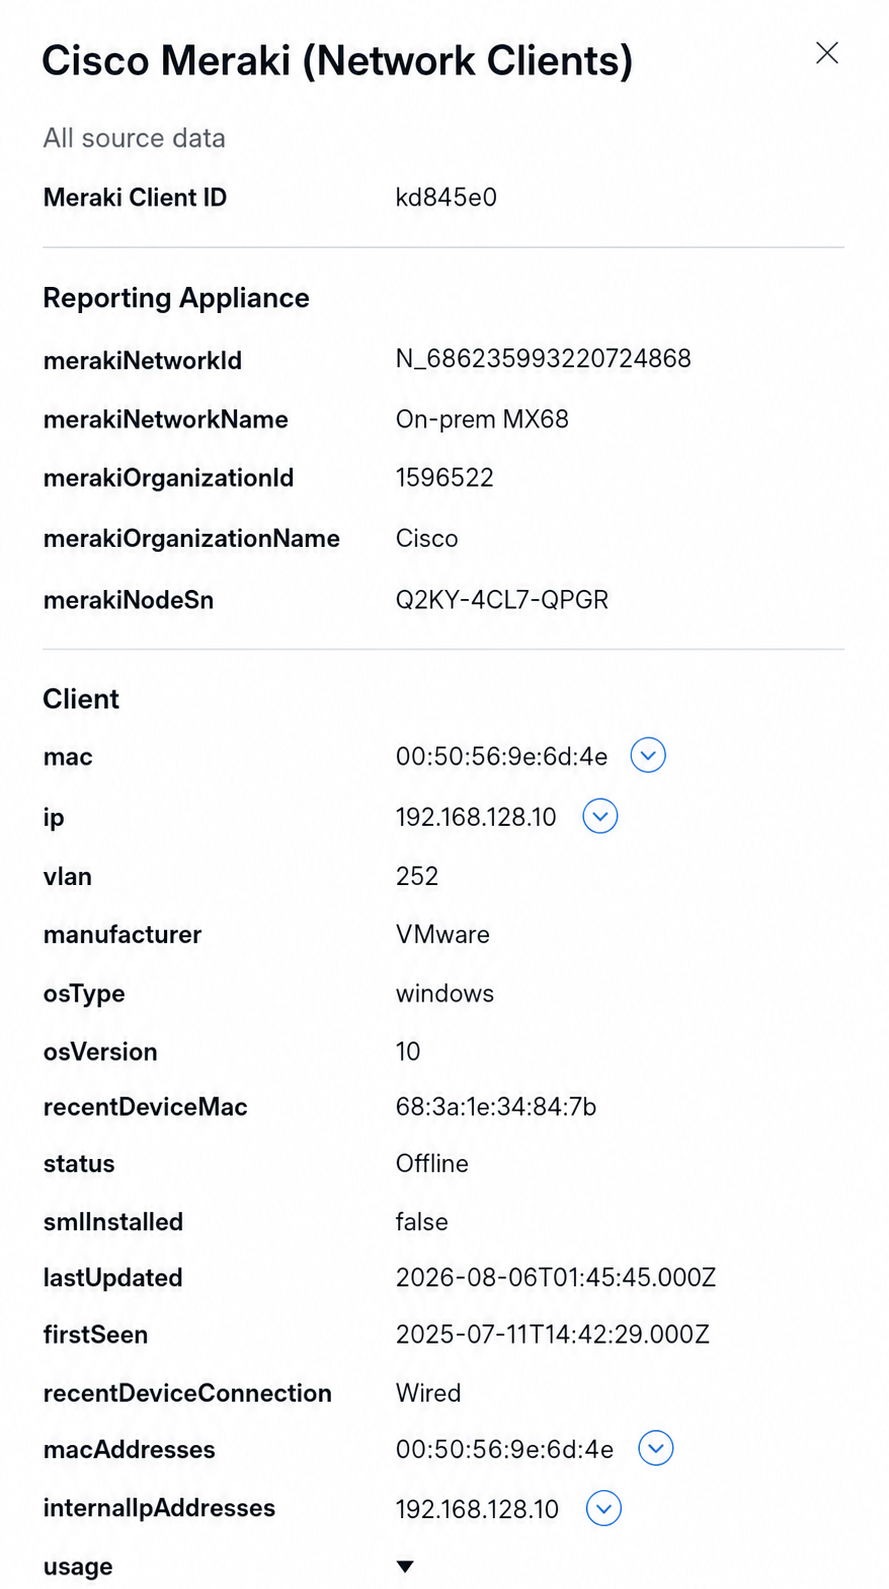
The device represents the Layer 3 device, not the endpoint at 172.16.249.64. The endpoint's actual MAC address, 00:50:56:9e:dc:98, does not appear in this Meraki device record. The operating-system and manufacturer values may also be misleading because Meraki is associating observed traffic and classification information with the Layer 3 device.
Cisco XDR representation and impact:
-
The Layer 3 device appears as the device instead of mx-l3-client.
-
Multiple endpoints behind the Layer 3 device will be represented by the same MAC-based device.
-
Client activity may be attributed to 192.168.128.10 and 00:50:56:9e:6d:4e.
-
The actual endpoint IP, 172.16.249.64, and MAC, 00:50:56:9e:dc:98, are not represented in this Meraki device record.
-
Endpoint context will be misleading because properties inferred from downstream traffic can be associated with the Layer 3 device.
-
Device inventory will under-represent the number of actual endpoints behind the Layer 3 device.
Track by IP
When Track by IP is enabled ,the Meraki MX does not expect clients to be one Layer 2 hop away, and instead identifies clients by observing unique IP addresses and DHCP traffic. This method can help Meraki separate clients behind a non-Meraki Layer 3 device because the original client IP address remains in the routed packet.
However, assuming devices can be tracked by IP address can lead to inaccuracies, such as when IP addresses are dynamically reassigned to other devices, when different devices use the same IP address in different IP namespaces, or due to Network Address translation (NAT).
MAC addresses shown by Meraki may also be inaccurate when using Track by IP, which can affect the MAC address context displayed in Cisco XDR. The following diagram provides an example of a Layer 2 and Layer 3 network topology with client tracking configured to Track by IP:
Clients Visible at Layer 2
If no Layer 3 device exists between the endpoint and the MX, Meraki can still see the client's original IP address and MAC address. Cisco XDR creates a Meraki Network Clients asset record that generally represents the endpoint accurately.
-
The endpoint appears as an individual device.
-
The IP address represents the endpoint.
-
The MAC address usually represents the endpoint because the MX has Layer 2 visibility.
-
Client activity is attributed to the endpoint.
Example: Track by IP with a Layer 2 Client
In this example, mx-l2-client is connected to the Meraki MX68 through a Layer 2 switch:
mx-l2-client > Layer 2 switch > Meraki MX68
The endpoint has hostname mx-l2-client, IP address 192.168.128.8, and MAC address 00:50:56:9e:d9:20. Because no Layer 3 device exists between the endpoint and the MX, the MX can see both the client's original IP address and original MAC address.
In the Meraki Dashboard, the client is shown with values such as:
-
Description: mx-l2-client
-
IPv4 address: 192.168.128.8
-
MAC address: 00:50:56:9e:d9:20
-
Connected device: 68:3a:1e:34:84:7b, representing the MX
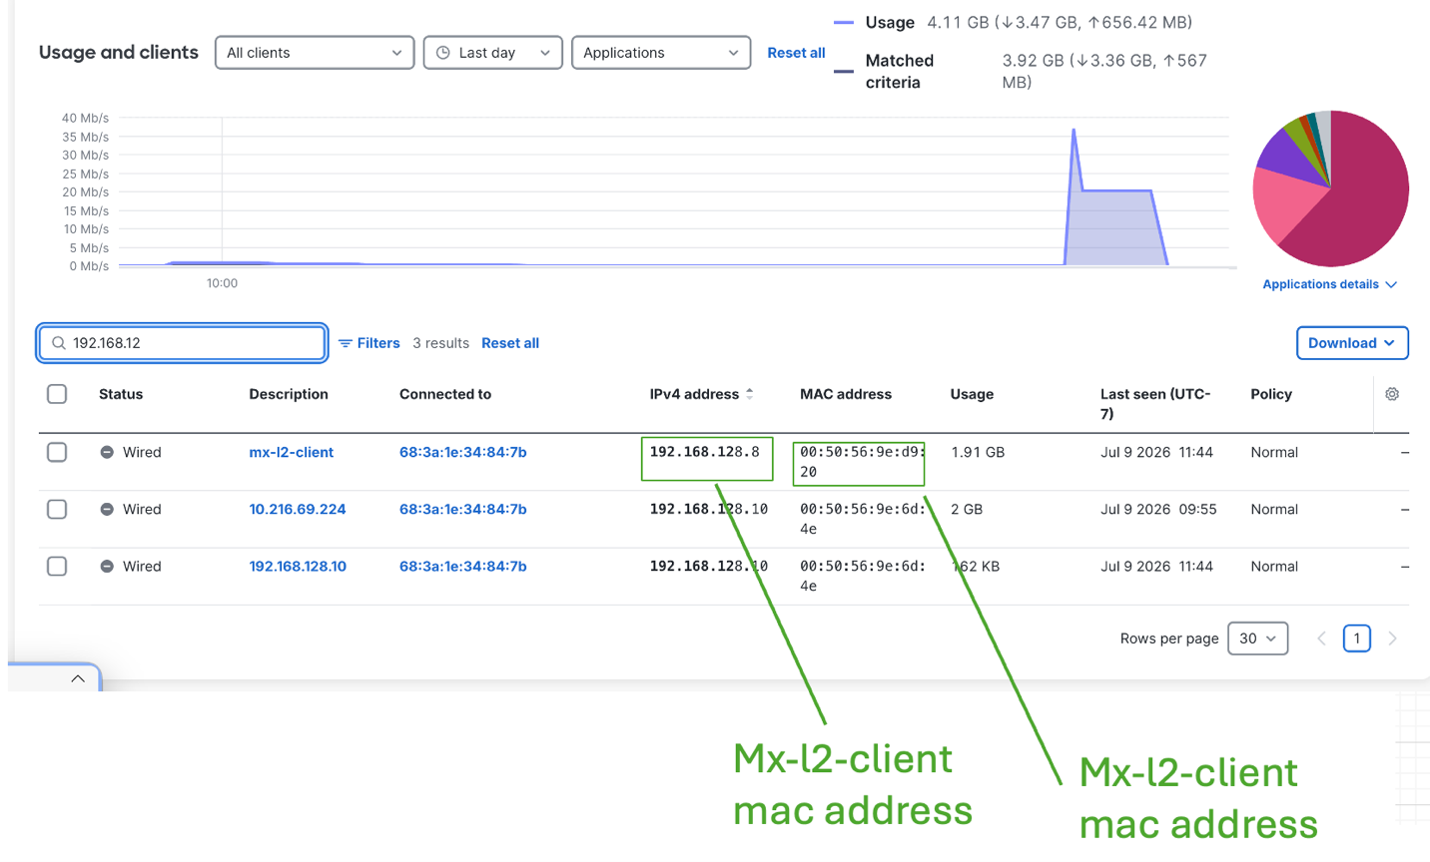
Cisco XDR creates a Cisco Meraki (Network Clients) device record that represents the endpoint. The record can include values such as:
-
description: mx-l2-client
-
ip: 192.168.128.8
-
internalIpAddresses: 192.168.128.8
-
mac: 00:50:56:9e:d9:20
-
macAddresses: 00:50:56:9e:d9:20
-
recentDeviceMac: 68:3a:1e:34:84:7b
-
recentDeviceConnection: Wired
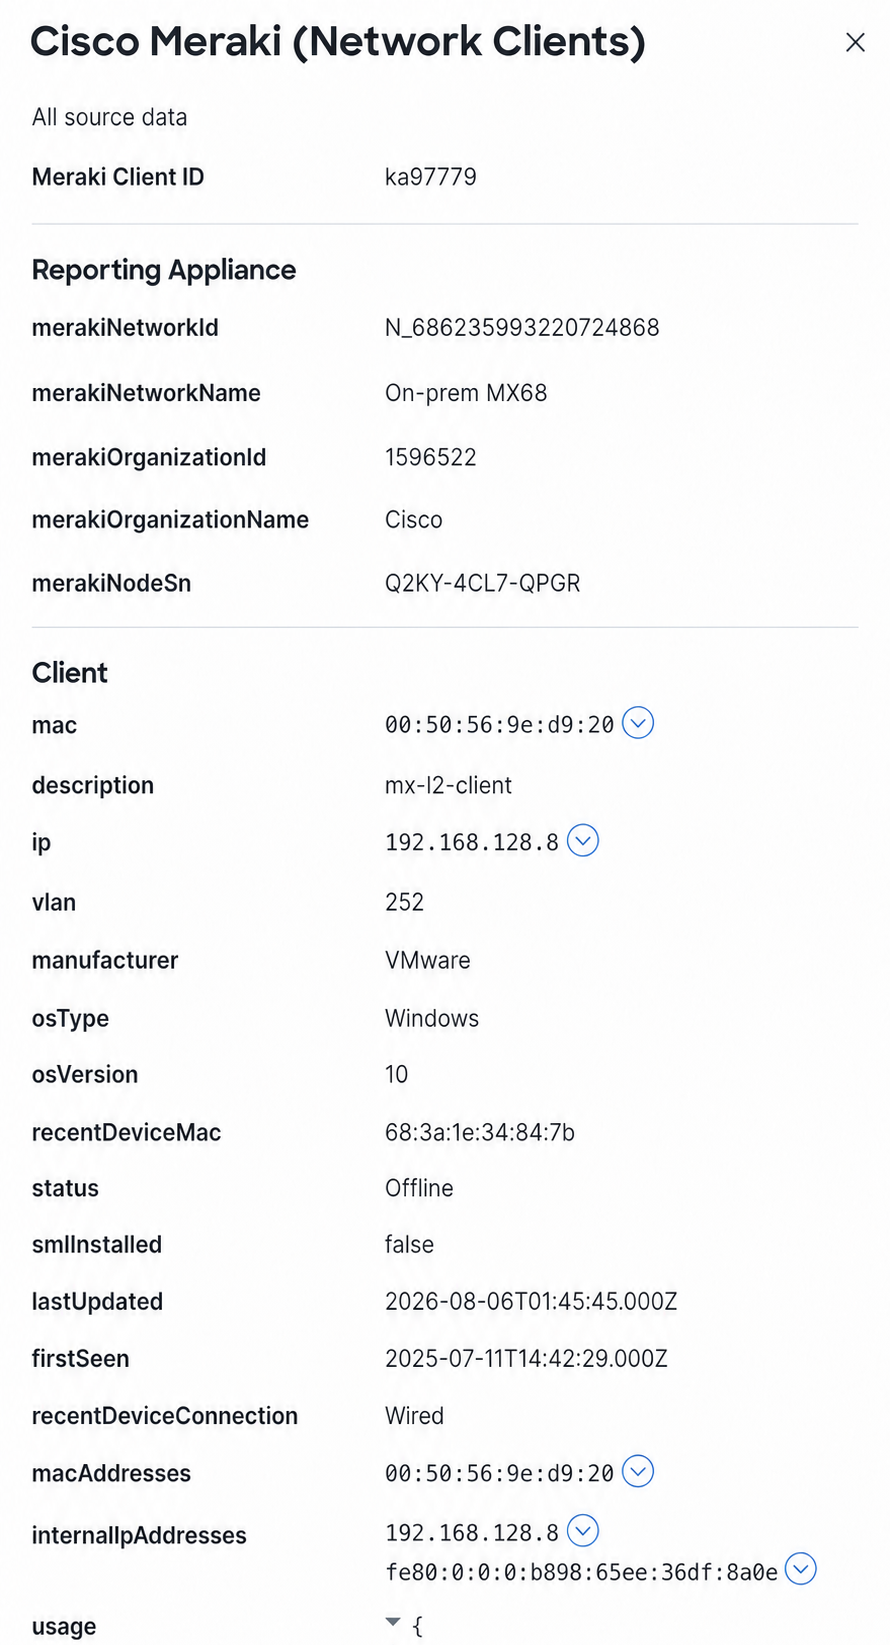
The IP address is the primary tracking identifier, but the MAC address still represents the endpoint because the MX has Layer 2 visibility.
Cisco XDR representation and impact:
-
The endpoint appears as an individual device.
-
The IP address represents the correct endpoint.
-
The MAC address also represents the correct endpoint because the MX has Layer 2 visibility.
-
Client activity is attributed to mx-l2-client.
-
Endpoint context is generally accurate.
-
Device inventory accurately reflects the client visible to the MX.
Clients Behind a Non-Meraki Layer 3 Device
If a non-Meraki Layer 3 device routes traffic between the endpoint and the MX, Meraki can observe the original client IP address but sees the MAC address of the Layer 3 device facing the MX. Cisco XDR can create separate IP-based device records for downstream clients, but those records can share the same Layer 3 device MAC address.
-
Downstream endpoints are more likely to appear as separate devices based on IP address.
-
The device IP address can represent the downstream client.
-
The device MAC address can represent the Layer 3 device interface instead of the actual endpoint.
-
Multiple IP-based devices can share the same MAC address.
-
Manufacturer, operating system, and device type can be incomplete or misleading if inferred from the shared Layer 3 MAC address.
-
Device identity and correlation should rely primarily on IP address instead of MAC address in this topology.
Note: IP-based tracking can also be affected by DHCP churn, IP reuse, overlapping IP namespaces, and network address translation. If client tracking changes from MAC-based to IP-based, IP-based and MAC-based records can temporarily appear as separate devices.
Example: Track by IP with Clients Behind a Non-Meraki Layer 3 Device
In this example, mx-l3-client is behind a non-Meraki Layer 3 device that routes traffic toward the Meraki MX68:
mx-l3-client > Layer 3 device > Layer 2 switch > Meraki MX68
The endpoint has IP address 172.16.249.64 and MAC address 00:50:56:9e:dc:98. The Layer 3 device facing the MX network has IP address 192.168.128.10 and MAC address 00:50:56:9e:6d:4e.
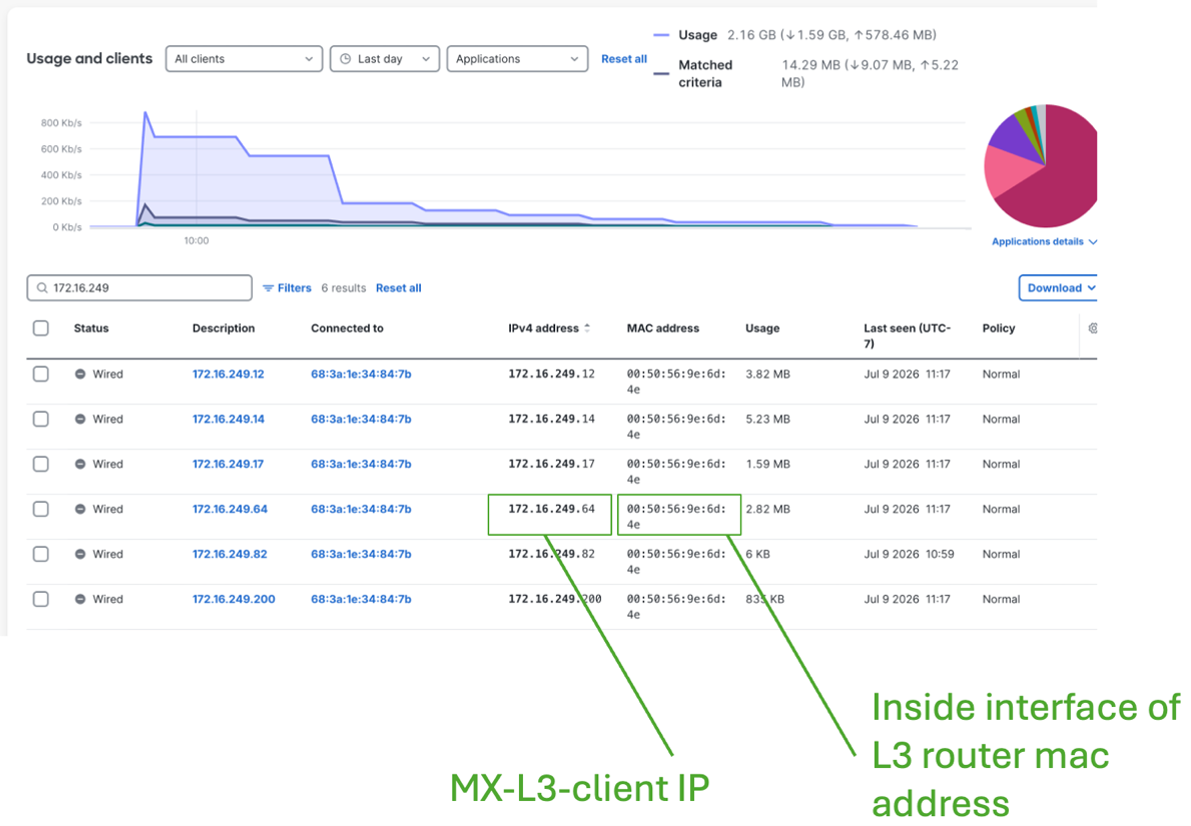
When the Layer 3 device routes the endpoint's traffic, the original IP address remains in the Layer 3 packet. However, the Ethernet frame sent toward the MX uses the Layer 3 device MAC address. The MX observes the original client IP address, 172.16.249.64, and the Layer 3 device MAC address, 00:50:56:9e:6d:4e.
The Meraki Dashboard can display multiple clients from the same downstream network as separate entries based on their IP addresses. For example, clients such as 172.16.249.12, 172.16.249.14, 172.16.249.17, 172.16.249.64, 172.16.249.82, and 172.16.249.200 can appear as individual clients while sharing the same displayed MAC address: 00:50:56:9e:6d:4e.
Cisco XDR creates a separate Cisco Meraki (Network Clients) device record for the IP address 172.16.249.64. The record can include values such as:
-
description: 172.16.249.64
-
ip: 172.16.249.64
-
internalIpAddresses: 172.16.249.64
-
macAddresses: 00:50:56:9e:6d:4e
-
recentDeviceMac: 68:3a:1e:34:84:7b
-
recentDeviceConnection: Wired
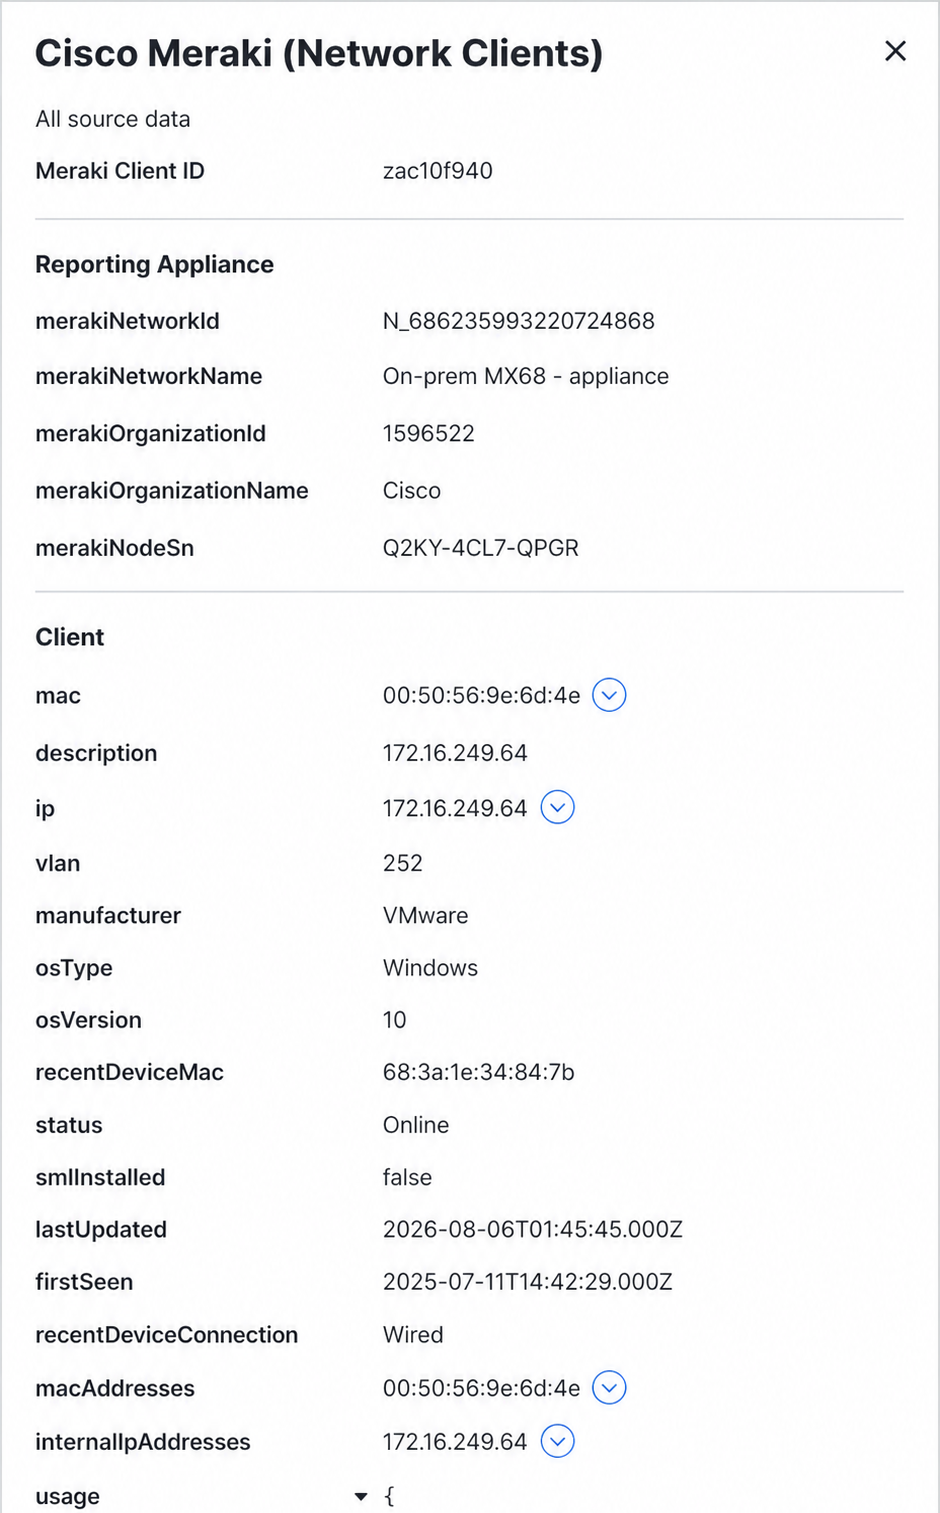
The device represents the downstream client primarily through its IP address. The MAC address attached to the device belongs to the Layer 3 device instead of the actual endpoint.
Cisco XDR representation and impact:
-
The downstream endpoint appears as a separate device based on its IP address.
-
The device’s IP address correctly represents mx-l3-client.
-
The device’s MAC address incorrectly represents the Layer 3 device’s interface.
-
Multiple IP-based devices will share the same MAC address.
-
Client activity is more accurately separated than it would be with Track by MAC.
-
Device identity and correlation should rely primarily on the IP address rather than on the MAC address.
-
Manufacturer, operating-system, and device-type context may be incomplete or misleading if they are inferred from the shared Layer 3 MAC address.
-
Device inventory more accurately reflects the number of downstream clients, but MAC-based context remains unreliable.
What's Next
You can perform the following tasks after you integrate Cisco Meraki with Cisco XDR:
-
Detections - View the security events generated by Cisco Meraki to validate the data that is ingested by Cisco XDR for incident generation. For details, see Detections.
-
Pivot Menu - Install the Cisco Meraki - MX - L3 Outbound Firewall Block workflow from the Automation Exchange to use the Pivot menu to access actions in Cisco Meraki. Available actions include allowing a user to block an IP address on a Cisco Meraki MX L3 outbound firewall.
-
Assets - View devices as reported by Cisco Meraki. For more information, including how to filter the view to only the reports from Cisco Meraki, see Devices.
-
Automation:
-
Atomic Actions - The atomic actions for Cisco Meraki can be used as building blocks in custom workflows. These can be found as available Actions in the left menu of the Workflow Editor. See Atomic Actions and Workflows.
-
Workflows - The workflows for Cisco Meraki can be installed from the Automation Exchange. See Workflows and Exchange.
-
Target - The Cisco Meraki target is automatically created for out-of-box and custom workflows. See Targets Created From Integrations.
-