Devices
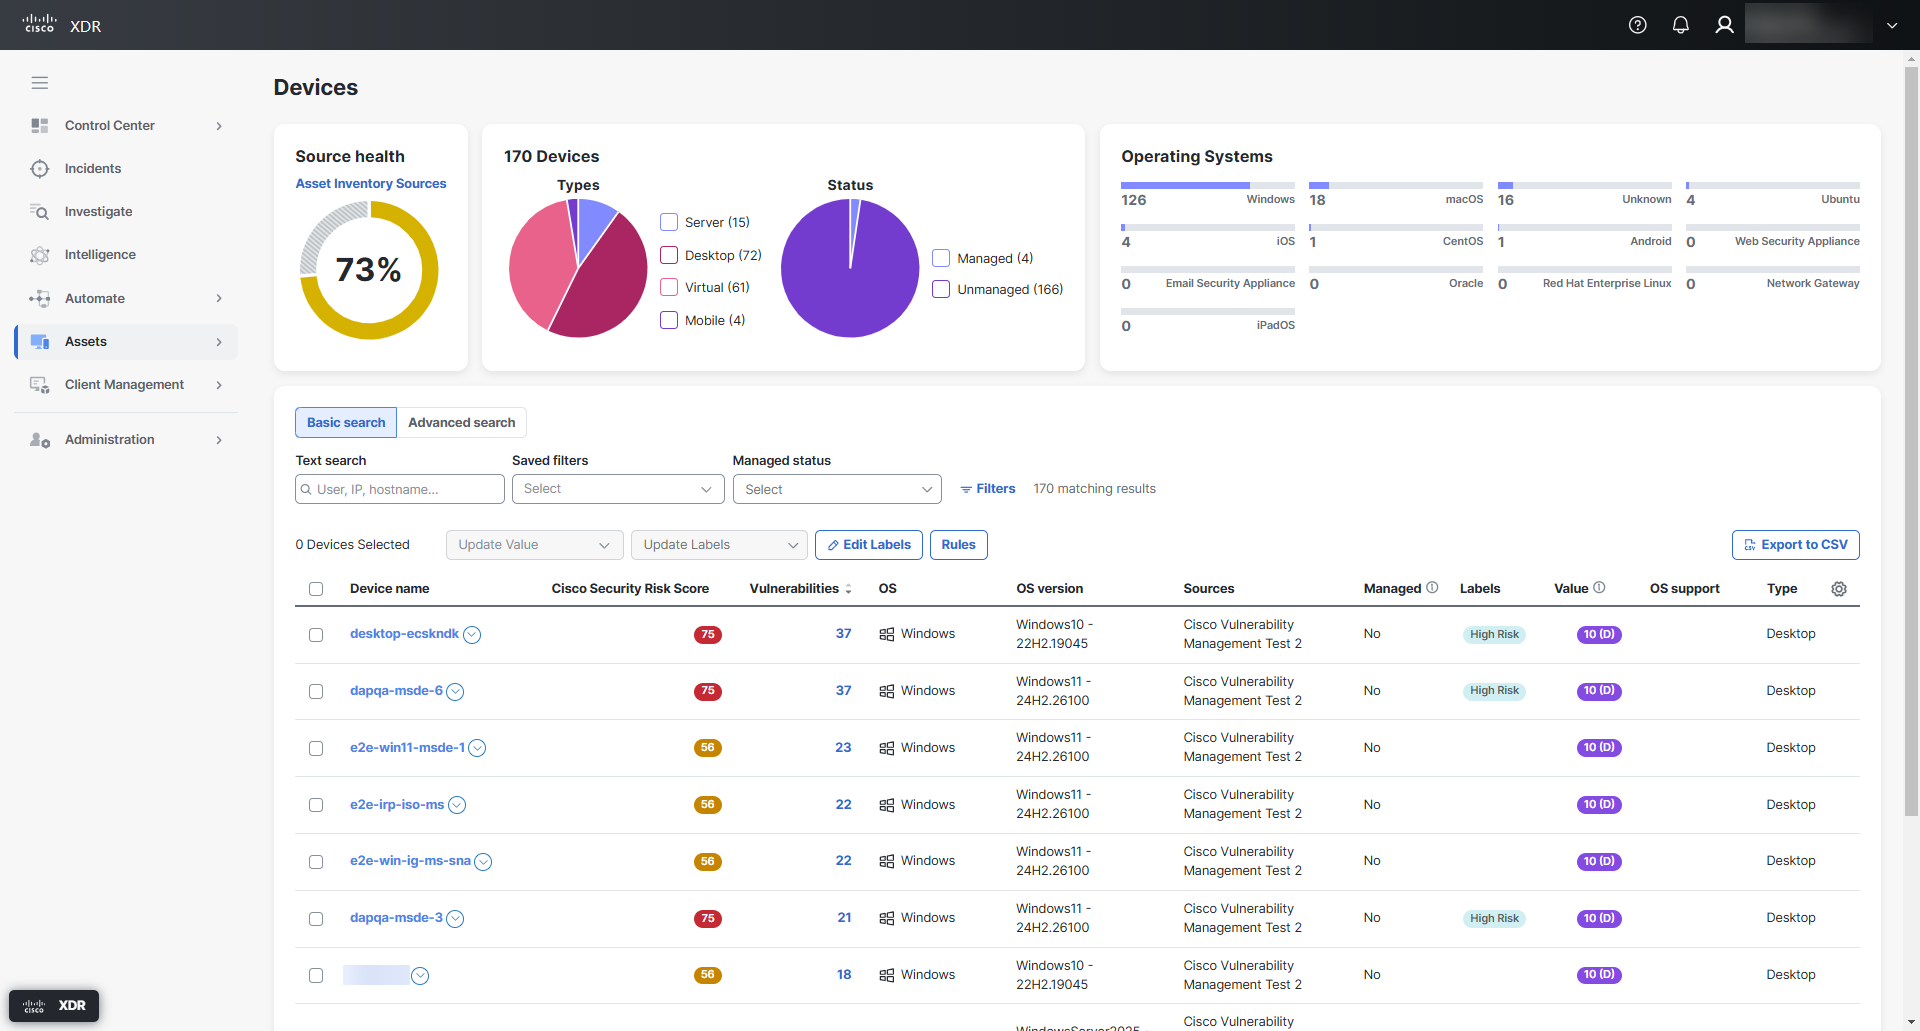
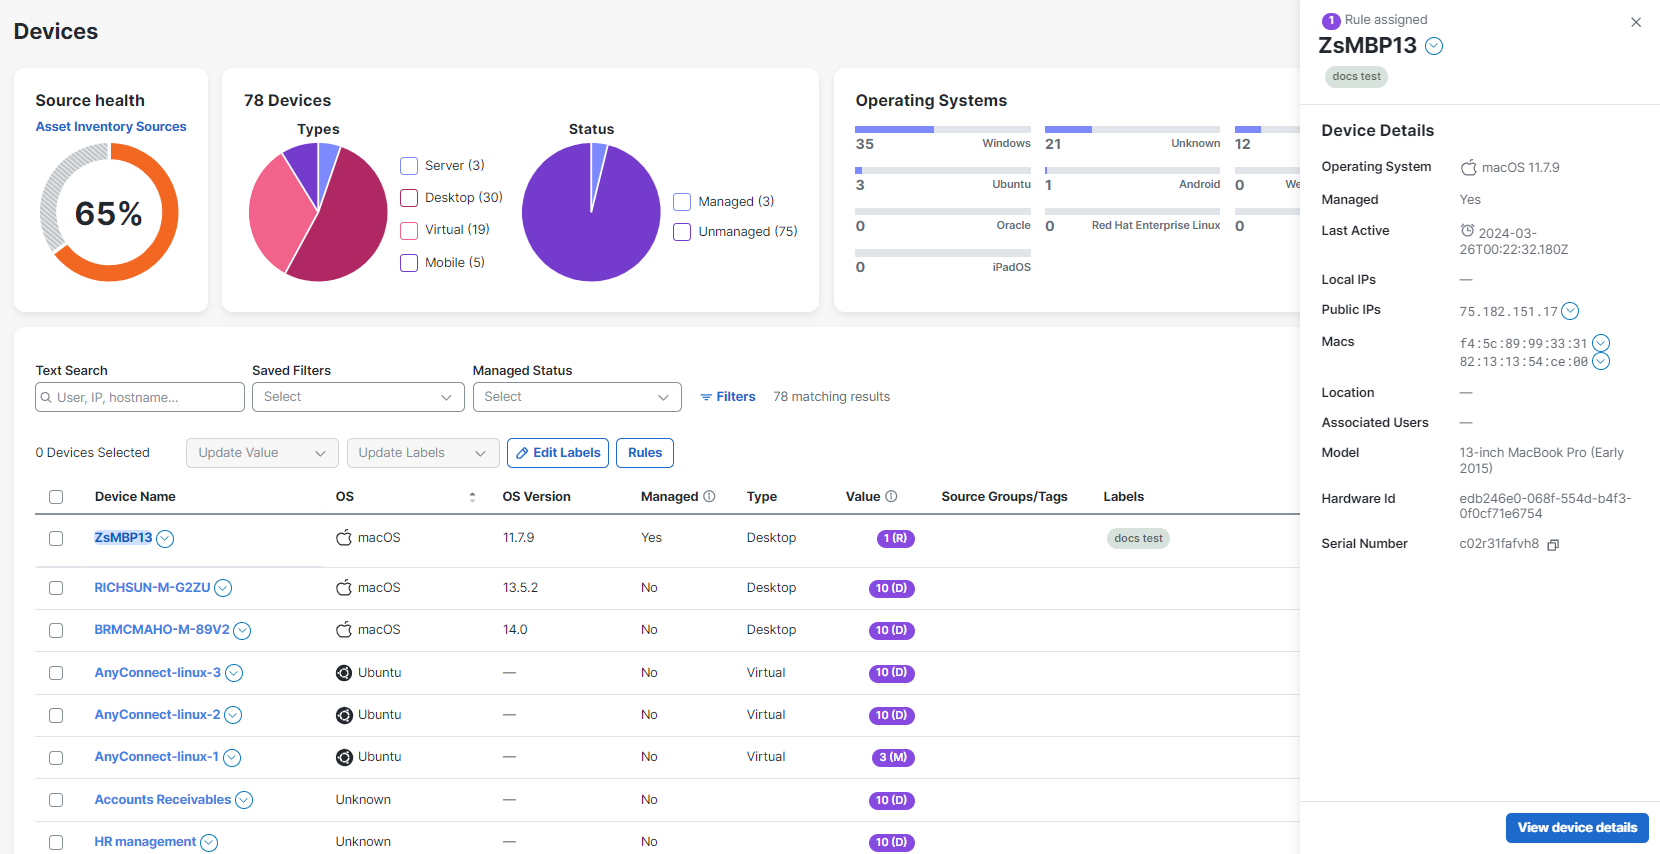
The Devices page provides an overview of the devices in your organization in a customizable table.
Choose Assets > Devices in the navigation menu to view the devices table and charts.
Each device name includes the ![]() (Pivot Menu) icon that enables you to take action on the device. You can perform some actions directly in the Pivot menu or pivot to the integrated product to perform additional actions.
(Pivot Menu) icon that enables you to take action on the device. You can perform some actions directly in the Pivot menu or pivot to the integrated product to perform additional actions.
Note: The header row check box will select all devices in the entire table.
Various charts show you some statistical information about your sources and devices, such as:
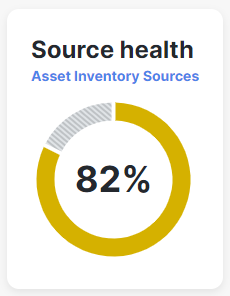
Shows you at-a-glance the overall health and status of your sources of data that are integrated with Cisco XDR and enabled for the Devices feature.
If this percentage is less than 100, there may be a health concern with one or more sources. Click Asset Inventory Sources to open the Sources page and look for the pertinent error message to help you resolve the issue.
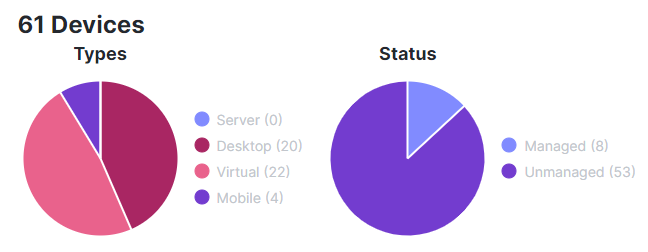
Displays pie graphs that show you the number of devices per device type (hover over the wedge segment) and how many are managed or unmanaged. Click a device type or status (or wedge segment) to list its devices in the inventory table.
Managed means it is a device in a device manager. Not restricted to only mobile devices, it works for all operating systems, as long as the device is managed by a device manager that you have linked in and that device manager reports that the device is being managed. Otherwise, if you remove the profile or app from a device, it will be marked as “Managed=No” in the device manager, and that gets reflected as Unmanaged in Cisco XDR.
To help you find the specific devices that you’re looking for, filter the devices listed in the inventory table by using the search box, saved filters, and the Filters drawer to select criteria in the search categories.
Use the Text Search box to filter the devices listed in the inventory table according to the text you enter.
Note: The search box is not case-sensitive when using Basic Search.
For example:
- Enter “demo” and Cisco XDR devices filters through all the device information, including device name, user names seen, and so on. If any of the device information contains the text you entered, that device will appear in the inventory table.
- Filter devices based on IP address. Enter a partial or complete IP address and the inventory table is updated in real-time as you type. Type 192.168 in the search box, and the inventory table will list all the devices that contain 192.168.
- Get more specific by adding a third octet such as 26, and only devices that contain 192.168.26 will appear in the inventory table.
Boolean Operators
You can also use the Boolean operators AND, OR, and NOT. They can make each search more precise and save you time.
For example:
- Enter “demo OR phone” in the search box and the table shows you devices that have the word “demo” in their data and devices that have the word “phone” in their data. Entering “demo phone” generates the same result.
- Enter “demo AND phone” in the search box and the table shows you devices that have both the words “demo” and “phone” somewhere in their data.
- Enter “NOT demo” in the search box and the table shows you devices that do not have the word “demo” in their information.
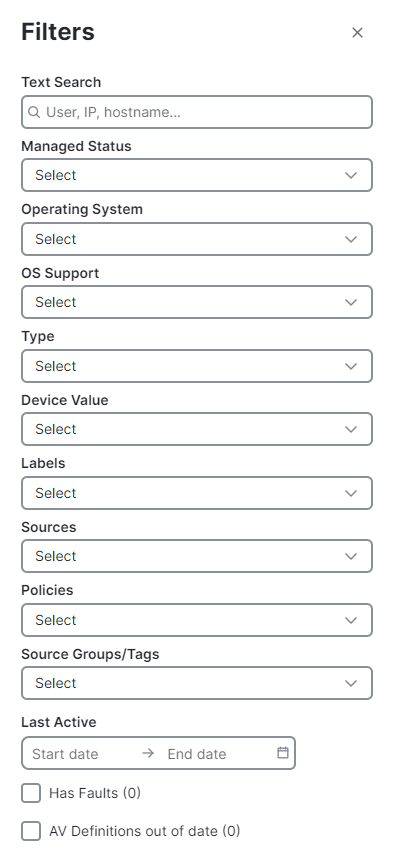
Another way to filter is to include the criteria in these search categories using the Filters drawer. Click Filters to open the drawer.
Each criteria shows the number (in parentheses) of devices in inventory that match that criteria.
These categories offer criteria that you can check to include them in your filter:
-
Managed Status
Managed means it’s a device managed by a device manager that you have linked and that device manager reports that the device is being managed. Otherwise, if the device is marked as “Managed=No” in the device manager, it gets reflected as Unmanaged in device inventory.
-
Operating System
-
OS Support
Cisco XDR can tell you when your operating systems are out-of-date or end-of-life for most of your devices. However, server platforms are excluded from this feature. Cisco XDR leverages a special feed from Duo Security, which provides OS lifecycle information, and applies it to its non-server device inventory. This does not require a Duo integration with Cisco XDR.
-
Type
server, desktop, virtual, mobile
-
Device Value
You can select multiple device values and if the value is assigned by default, manually, or a rule.
- Has Faults
- AV Definitions out of date
These categories offer criteria that you can set to Must Include to include that criteria in your filter, or conversely Must Exclude:
- Labels
- Sources
- Policies
-
Source Groups/Tags
Source groups and tags are imported from integrations with Cisco XDR. Currently, we import groups from Secure Endpoint and tags from Cisco Meraki.
This category offers criteria where you select a start and end date to filter by the specified time range:
-
Last Active
This category offers criteria where you enter a value to filter by:
-
Minimum Cisco Security Risk Score
Enter a value between 1 and 100. The table will be filtered to show devices with a Cisco Security Risk Score of the specified value and higher.
Checks Across Multiple Categories
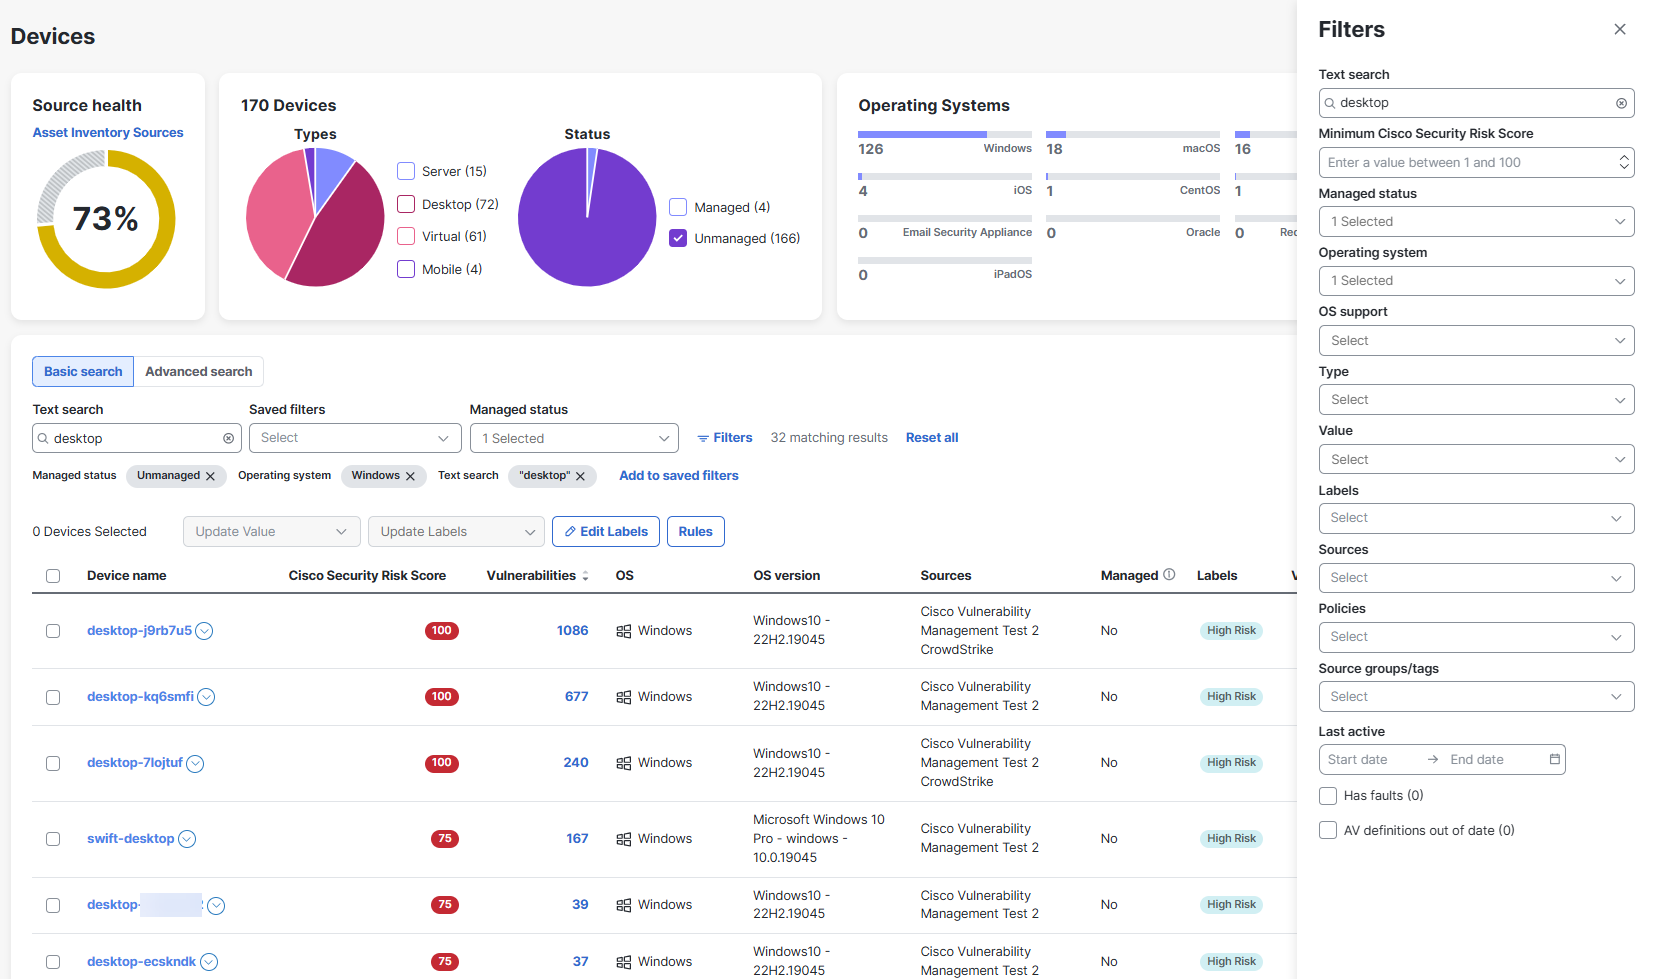
A filter with checks across multiple categories results in a Boolean AND operation. For example, this filter results in the inventory table showing only the devices that meet all the specified conditions:
-
Text Search
have the text “desktop” somewhere in their information
-
Managed Status
is Unmanaged
-
Operating System
is running Windows
Checks Within a Category
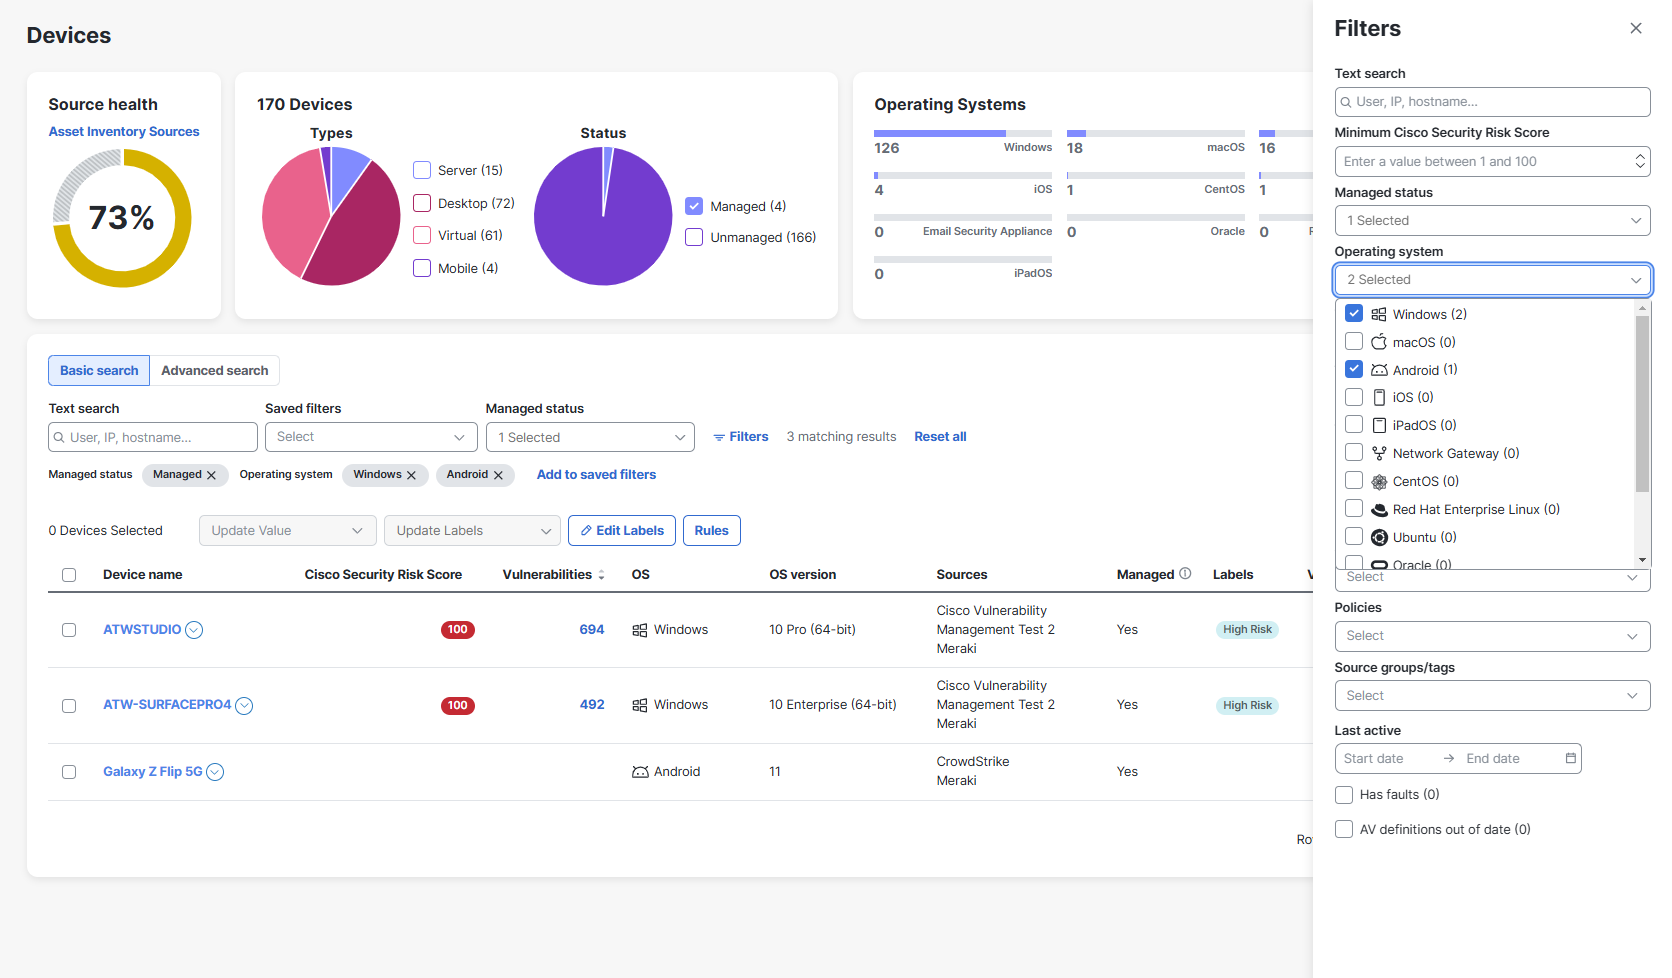
Multiple checks within the same category results in a Boolean OR operation in that category. For example, this filter results in the inventory table showing all the unmanaged devices that are either running Windows or macOS:
-
Managed Status
is Unmanaged
-
Operating System
is running Windows
-
Operating System
is running macOS
These are just a few examples of how you can quickly search through your device inventory using the powerful filter to help you find what you’re looking for.
At any point, you can save the filter selection you’ve configured and pull it up to use again later, saving you the time of having to build it again. Click Add to saved filters to save it in your organization, and all users in the organization will be able to use that filter selection.

To conveniently use a saved filter again, select it from the Saved filters drop-down list. This added flexibility enables you to continue your search later and pick up where you left off. You can also modify a filter to save a new version of it and share a common filter for use across your organization.
To delete a saved filter, click the Saved filters drop-down list, then click the ![]() (Delete) icon. Click Delete to confirm.
(Delete) icon. Click Delete to confirm.
You can sort the table by a specific column and select the columns displayed to customize the table for the data you want to view.
You can scroll the list of devices using the scroll bar on the page or the up and down arrow keys on your keyboard. You can also edit the number of rows shown per page at the bottom of the table.
Note: If you have a large number of devices, selecting the last page of the table will cause a loading error to occur. Use filters to reduce the number of devices in the table to avoid the error.
Click the (Sort) icon next to the column headers to sort the table by that column in ascending or descending order.
To reorder the table columns, click and drag a column header to the desired position in the table.
Click the ![]() (Settings) icon to open the Select columns drawer and check the check boxes next to the columns you want displayed in the table.
(Settings) icon to open the Select columns drawer and check the check boxes next to the columns you want displayed in the table.
Note: Only users with an Administrator role can create, edit, and delete labels.
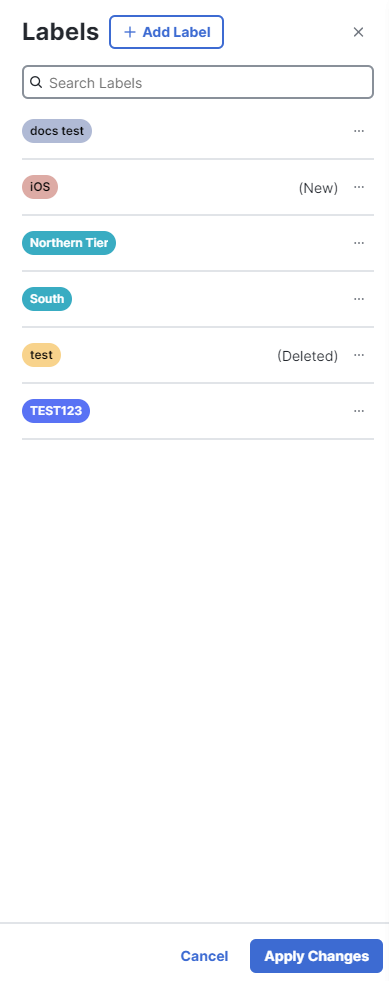
The Labels drawer allows you to manage the labels that can be assigned to your devices. You can perform multiple tasks in the drawer and then click Apply Changes to confirm.
From the Labels drawer, you can perform the following tasks:
To create a label:
-
Click Edit Labels to open the drawer.
-
Click Add Label.
-
Enter a name and select a color for the new label.
-
Click the
 (Add) icon.
The new label will be added to the drawer with a (New) tag. -
Click Apply Changes to confirm all actions in the drawer.
Use the Search Labels text box at the top of the drawer to locate specific labels within the list. The labels that match your search are displayed in the drawer.
To edit a label:
-
Click Edit Labels to open the drawer.
-
Click the
 (Ellipsis) icon to open the Options menu for the label you want to edit.
 -
Choose Edit.
-
Update the label name or color.
-
Click Apply Changes to confirm all actions in the drawer.
To delete a label:
-
Click Edit Labels to open the drawer.
-
Click the
 (Ellipsis) icon to open the Options menu for label you want to delete.
 -
Choose Delete.
The label will have a (Deleted) tag in the drawer. -
Click Apply Changes.
-
Click Delete to confirm.
Note: Deleting a label will remove it from all assigned devices.
Note: Only users with an Administrator role can create, edit, and delete rules.
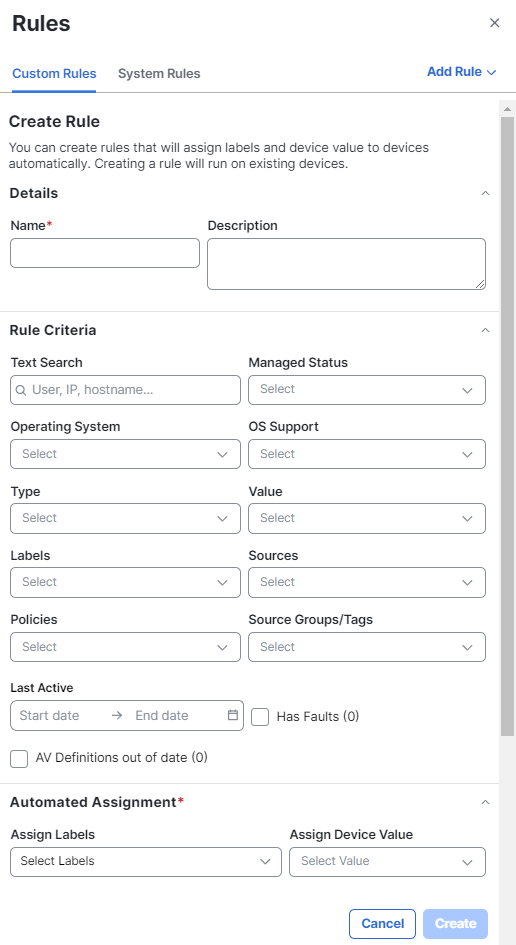
The Rules drawer allows you to manage rules that will assign labels and values to devices automatically.
From the Rules drawer, you can perform the following tasks:
Note: It can take up to 15 minutes for new or updated rules to be applied to existing devices.
To create a rule from search criteria:
-
Click Rules to open the drawer.
-
Click the Add Rule drop-down menu.
-
Choose Create Rule from Search. The Create Rule section opens with the criteria used in the Filters drawer.
-
Enter a name and description for the rule.
-
Edit the rule criteria if needed. For more information, see Filters.
-
Assign labels and a device value to apply to each device in the selected rule criteria.
-
Click Create.
A success message is displayed, and the drawer refreshes with the rule added.
To create a rule from scratch:
-
Click Rules to open the drawer.
-
Click the Add Rule drop-down menu.
-
Choose Create Rule from Scratch. The Create Rule section opens.
-
Enter a name and description for the rule.
-
Add the rule criteria. For more information, see Filters.
-
Assign labels and a device value to apply to each device in the selected rule criteria.
-
Click Create.
A success message is displayed, and the drawer refreshes with the rule added.
To edit existing rules:
-
Click Rules to open the drawer.
-
Click the
 (Ellipsis) icon to open the Options menu for the rule you want to edit.
 -
Choose Edit.
-
Edit the rule.
-
Click Save when done.
A success message is displayed, and the drawer refreshes.
To enable or disable a rule:
-
Click Rules to open the drawer.
-
Click the toggle for the rule you want to enable or disable.
-
Click Enable or Disable to confirm.
A success message is displayed, and the drawer refreshes.
Note: Deleting rules is permanent and cannot be undone. All devices affected by the deleted rule will revert to their default value and label.
To delete a rule:
-
Click Rules to open the drawer.
-
Click the
 (Ellipsis) icon to open the Options menu for the rule you want to delete.
 -
Choose Delete.
-
Click Delete to confirm.
A success message is displayed, and the drawer refreshes with the rule removed.
If you have a custom source or ServiceNow SecOps, you may have default rules defined by the system in the System Rules tab.
To edit a system rule:
-
Click Rules to open the drawer.
-
Click the System Rules tab.
-
Click the
 (Ellipsis) icon to open the Options menu for the rule you want to edit.
 -
Choose Edit.
-
Edit the rule.
-
Click Save when done.
A success message is displayed, and the drawer refreshes.
Note: Only users with an Administrator role can download a CSV.
Click Download CSV to download the table to a spreadsheet file. The file only includes the devices and data in the current table, and if applicable, rows in additional table pages.
The Device Value is assigned to devices to provide more context in Cisco XDR Incidents. The value can be set from 1-10, where 1 is the least critical and 10 is the most critical. If the value is high, it will increase the incident priority score. Users with an Administrator role can update the value in the Devices table, on the Device Details page, or by creating a rule to automatically assign a value to certain devices.
To update values for one or more devices:
-
Check the check boxes next to the devices you want to update.
-
Click the Update Value drop-down menu in the bulk action bar and choose the new value.
-
Click Update.
Note: If a device's value is affected by multiple rules, the higher value will be assigned to the device. You cannot manually assign a value lower than a rule assigned value.
Note: Only users with an Administrator role can update labels on a device.
You can update labels for one or more devices at a time using the bulk action bar.
To update labels for one or more devices:
-
Check the check boxes next to the devices you want to update.
-
Click the Update Labels drop-down menu in the bulk action bar and choose the new labels.
-
Click Add.
To update labels for one or more devices:
-
Check the check boxes next to the devices you want to update.
-
Click the Update Labels drop-down menu in the bulk action bar and choose the labels you want to remove.
-
Click Remove.
Click a Device Name to open the Device Details drawer.
Drawer Header
The upper portion of the drawer shows the following information about the device:
|
Value |
The value assigned to the device and whether the value was assigned by a rule, manually, or by default. |
|
Device Name |
The device name that is displayed in the table is also displayed in the upper portion of the drawer. Click the |
|
Labels |
Shows all of the labels assigned to the device. If the label was manually assigned, you can click the X (Remove) icon to remove the label from the device. |
|
Cisco Security Risk Score |
The risk score of the highest risk vulnerability on the device. |
|
Operating System |
The operating system running on the device. |
|
Managed |
Indicates if a device managed by a device manager reports that the device is being managed. |
|
Last Active |
Date the device was last seen. |
|
FQDN |
The fully qualified domain name of the device. |
|
Local IPs |
Internal IPs for the device. Click the |
|
Public IPs |
External IPs for the device. Click the |
|
Macs |
The 12-character alphanumeric attribute that is used to identify the device on a network. Click the |
Sources
The Sources panel is expanded by default and displays which sources provided data for this device.
Vulnerabilities
The Vulnerabilities panel is expanded by default and displays the top five vulnerabilities for this device identified by Cisco Vulnerability Management. Click View all to pivot to the Vulnerabilities page.
Users
The Users panel is expanded by default and displays the users seen on this device. Click on a user name or email address to expand the User Details drawer. For more information about what is displayed in the drawer, see View Summary of User Details in Drawer. If more than 5 users have been seen on this device, click View all to see the entire list of users.
Note: User names can be associated with multiple email addresses. Clicking a user name with multiple records opens a drawer displaying a list of users with that name for selection.
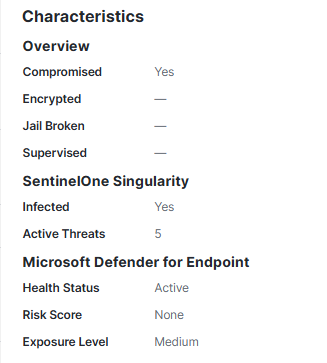
Characteristics
The Characteristics panel is expanded by default and displays whether the device is compromised, encrypted, jail broken, or supervised.
The following sources provide additional characteristics for the device:
-
Cisco Duo: Trusted Endpoint
-
Microsoft Defender for Endpoint: Health Status, Risk Score, and Exposure Level
-
Orbital: Windows Security Center (Only Windows devices)
-
SentinelOne Singularity: Infected and Active Threats
View Device Details
To view more information about the device, click View device details in the lower portion of the drawer to open the Device Details page. For more information, see the Device Details help topic.
You might see duplicate devices, usually because the agent from the source was reinstalled, and the new unique identifier is added to the source system while the duplicate was not deleted.
If both GUIDs are still valid, the source is telling Cisco XDR that the two devices exist. So if a device is not deleted from the source, Cisco XDR will not delete it either.
Cisco XDR stores devices for 90 days and will discard records that are older than 90 days when syncing with sources.
Device managers generally do not delete old devices, but in many cases will mark the old devices as unmanaged. Administrators must delete the old devices from the inventory in the device manager.
For example:
|
Source |
Note |
|---|---|
|
Orbital |
Automatically deletes old devices after 90 days. |
|
Secure Endpoint |
Does not automatically delete old devices. |
|
Umbrella |
Does not automatically delete old devices. |
From a Duo source:
- If there are no devices appearing from Duo, but the source is healthy, it is because Trusted Endpoints or Device Health application is not being used in the auth policy. Ensure that both are checked.
- A device must go through a Duo auth using the DHA (or a certificate for some trusted devices) for there to be enough information for Duo to collect and uniquely identify the device.
