Remote Setup and Deployment
To configure a new Automation Remote, create the Remote in your Automation tenant, choose the package type that matches your infrastructure, download the configuration and appliance packages, and deploy the Remote. After the Remote connects, configure targets to use it.
Automation Remote supports the following target types:
The maximum number of Remotes you're allowed to create is 20.
 Create a New Remote
Perform the following steps to create a new Remote on your Automation tenant:
-
Navigate to Automate > Targets.
-
Click the Remotes tab, and click the New remote button.

-
Enter a meaningful Display Name and optional Description.
-
In the Remote Details section, choose the Remote type:

-
Virtual appliance (OVA) - Use this option for VMware vSphere or vCenter deployments.
-
Docker package - Use this option for Docker Compose deployments on supported Linux AMD64 hosts.
-
-
If you selected Virtual appliance (OVA), complete the OVA-specific details:
-
In the Remote Details section, click DHCP or Static IP to set your DNS type.
-
If you are using a Static IP, provide the IP address in CIDR notation, DNS server list, and default gateway.
-
If a proxy is required for the Remote to access the internet, click the Requires Proxy toggle and enter the Proxy Address. Only SOCKS5 proxies are supported.
-
Default gateway (for example: 192.168.1.1)
-
If you want to override the default subnets, click Show advanced options and enter the Remote Cluster Subnet and Remote Service Subnet.
Note: In some cases, the default subnets may collide with your existing network. In such a scenario, you may need to override the default values with whatever subnet you have available. However, any changes you make to the default subnets are permanent and cannot be reversed without installing a new appliance.
-
Choose the certificate validity period for the Remote from the Certificate Expiration drop-down menu in the Certificate Configuration section. The maximum certificate validity period is 2 years.

-
Click Save.
The new Remote is displayed in the list with a status of Not Connected. The Remote type is not editable after the Remote is created. To use a different deployment type, create a new Remote and choose the required type.
Download the Configuration Package
Configuration information is unique to each Remote. After you create a Remote in Automation, generate and download its configuration package.
-
On the Remotes page, hover the mouse over the new Remote you just created and click the ellipsis (…) in the Actions column to open the drop-down menu.

-
Choose Connect from the Actions drop-down menu.
-
In the Connect Remote dialog box, click Generate Package.

A Remote configuration package is downloaded to your system. The file name uses the format <_remoteName_>_remotePackage_<_timestamp_>.zip. For example, if the name of your Remote is Sample, the file downloaded on June 27, 2025 is Sample_remotePackage_20250627T211940.zip.
-
Keep the package available for deployment:
-
For OVA deployments, unzip the package and use the remoteconfig text file during vSphere template customization.
-
For Docker deployments, keep the .zip file and provide it to the register-remote tool.
Download the Appliance Package
Download the appliance package that matches the deployment type you selected when you created the Remote.
-
On the Remotes page, click the Download appliance button.
-
In the Download Appliance Package dialog box, choose the package format that matches your deployment infrastructure.
-
Review the package card:
-
OVA format is compatible with VMware, vSphere, and vCenter.
-
Docker package is compatible with Docker Compose.
-
Each card shows the package version and SHA-256 hash.
-
-
Click Download OVA or Download Docker.
-
Verify the downloaded package against the SHA-256 hash shown in the dialog box.
-
On Linux, run:
sha256sum <downloaded_file> -
On macOS, run:
shasum -a 256 <downloaded_file>
The value returned by the command must match the SHA-256 hash shown in the package card.
-
Deploy an OVA Remote
Use these steps when the Remote type is Virtual appliance (OVA).
Note: Setting up an OVA-based Automation Remote virtual appliance requires advanced understanding of how to create and manage resources in VMware. If you encounter issues within the vSphere client, contact an administrator in your organization or VMware support.
-
In your VMware vSphere client, right click the folder you want to deploy the Remote in, and select Deploy OVF Template.
-
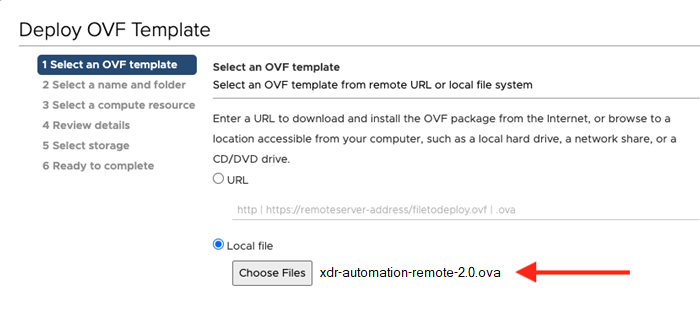
Click the Local file radio button, and click Choose Files. Navigate to the Remote OVA you downloaded, and select it.
-
Click Next.
-
Give the virtual appliance a unique name, confirm the location for the virtual machine, and click Next.

-
Click the compute resource where the virtual appliance will be deployed, and click Next.

-
Review the details of the deployment, and click Next.
-
In the list of datastores, choose the datastore you want to use for the virtual appliance, and click Next.
Note: We recommend a minimum of 30 GB of available disk space for an Automation Remote.

-
For each Source Network, click the Destination Network drop-down, choose the network where you want to deploy the virtual appliance, and click Next.

-
On the Customize Template or Customize vApp properties screen, provide the following information:
-
Unique ID and hostname for the virtual appliance.
-
(Optional) SSH public key for SSH access to the appliance (see Generate an SSH Key Pair below).
-
Set Encoded user-data to the contents of the remoteconfig text filefrom the Remote configuration package.
-
Set a Default user’s password for access to the virtual appliance console (username: ubuntu).

To avoid a setup failure, your password must be at least 14 characters long and contain at least:
-
1 uppercase letter
-
1 lowercase letter
-
1 number
-
1 special character
The password must not contain:
-
More than 3 identical characters in a row (for example, aaa)
-
More than 3 sequential character (for example, 123, abc)
-
Your username
-
Common dictionary words

-
-
-
Click Next.
-
Review all of the virtual appliance details, and click Finish.
-
After the virtual appliance deployment completes, click Power On to start the appliance.
When the appliance is online, the Status of the Remote should change from Not Connected to Connected on the Remotes page.
Note: A newly deployed Remote may take up to 10 minutes to show as connected.
Define NTP Servers for an OVA Remote (Optional)
After deploying your Automation Remote, you can configure the virtual appliance to use custom NTP servers using these steps.
For Docker deployments, configure time synchronization on the Docker host operating system.
Note: If you are unsure of the settings to use, contact your network administrator.
-
Sign in to your virtual appliance using one of the following methods:
- Open a console to the VM in vSphere and sign in with your password.
- SSH to the VM using the key pair you created during setup.
-
Open the /etc/chrony/chrony.conf file and change the NTP servers to your preferred servers.
-
Save and close the file.
-
Run the following command to restart the NTP service and verify that the time is correct:
systemctl restart chronyd ; watch chronyc tracking
Deploy a Docker Remote
Use these steps when the Remote type is Docker package.
Docker Prerequisites
-
Docker must be installed and running. The docker info command must succeed.
-
The host must be Linux x86_64/AMD64.
-
The registration commands must be run as root or with sudo.
Quick Start
-
Copy the Docker package and the Remote configuration package to the Linux host.
-
Extract the Docker package:
tar -xzf xdr-automate-remote-<version>-linux-amd64.tar.gzcd xdr-automate-remote -
Register the Remote. For an interactive setup, run:
sudo ./register-remoteThe tool prompts you to provide the `remotePackage.zip` file generated from the Remotes page in Automation.
To provide the package directly, run:
sudo ./register-remote -i remotePackage.zip -
After registration completes successfully, start the containers:
sudo docker compose up -dWhen the containers are running, the Status of the Remote should change from Not Connected to Connected on the Remotes page.
Registration Tool Options
Run sudo ./register-remote --help to view all available options.
Common options include:
|
Option |
Description |
|---|---|
| -i, --input-file <file> | Path to the remotePackage.zip file. This is the recommended registration method. |
|
-b, --base64 <string> |
Base64 string from the configuration package. Use this as an alternative to --input-file. |
|
-d, --deregister |
Deregister an existing Remote deployment. This stops and removes running containers and cleans up certificates and environment files. |
|
-s, --status |
Check the current registration status, including running containers and health. |
|
-y, --yes |
Auto-answer yes to confirmation prompts. |
|
-n, --n |
Auto-answer no to confirmation prompts. |
|
--log <file> |
Write log output to a file. |
|
--debug |
Enable verbose debug logging. This option requires --log. |
|
-v, --version |
Print the registration tool version and exit. |
The -i and -b options are mutually exclusive. The --yes and --no options are mutually exclusive.
Docker Troubleshooting
-
If docker command not found appears, install Docker and ensure it is in your PATH.
-
If Unable to execute docker appears, start the Docker daemon. For example: sudo systemctl start docker.
-
If This program must be run as root appears, prefix the command with sudo or run as root.
-
If registration fails partway through, run sudo ./register-remote -d to clean up partial state, then retry registration.
-
If detailed diagnostics are needed, re-run registration with --log <file> --debug and share the log file with support.
Generate an SSH Key Pair
If you want to use SSH to access your OVA-based Remote virtual appliance, you must generate a key pair for authentication. You can use any key pair that is valid for a standard Ubuntu authorized_hosts file, such as RSA or ED25519.
Use the following examples to generate a default RSA key pair.
Linux/macOS
-
Open a terminal and execute the following command:
ssh-keygen -t rsa -b 4096 -f /path/to/output/keypair -
If you want to use a passphrase, enter the passphrase and confirm it. If not, press Enter twice.
A public and private key will be generated at the path you provided:
- keypair contains the private key
- keypair.pubcontains the public key
Windows
Use the PuTTygen utility to generate a keypair:
- Download PuTTygen. Use the file puttygen.exe located under Alternative binary files.
- Run puttygen.exe.
- To use a passphrase for your key pair, enter it in the Key passphrase and Confirm passphrase fields.
- Select the type of key and key length at the bottom of the window. We recommend a minimum 2048-bit RSA key.
- Click Generate.
- Use the Save public key and Save private key buttons to export the keys.
Configure Target to Use the Remote
Configure your on-premises targets to use the Automation Remote.
-
Navigate to Automate > Targets.
-
Select the target you want to add a remote to (or create a new target).
-
Under the Remotes section, click the Remote Keys drop-down list, and choose the Remote you want to use with this target.

-
Click Submit.