Users
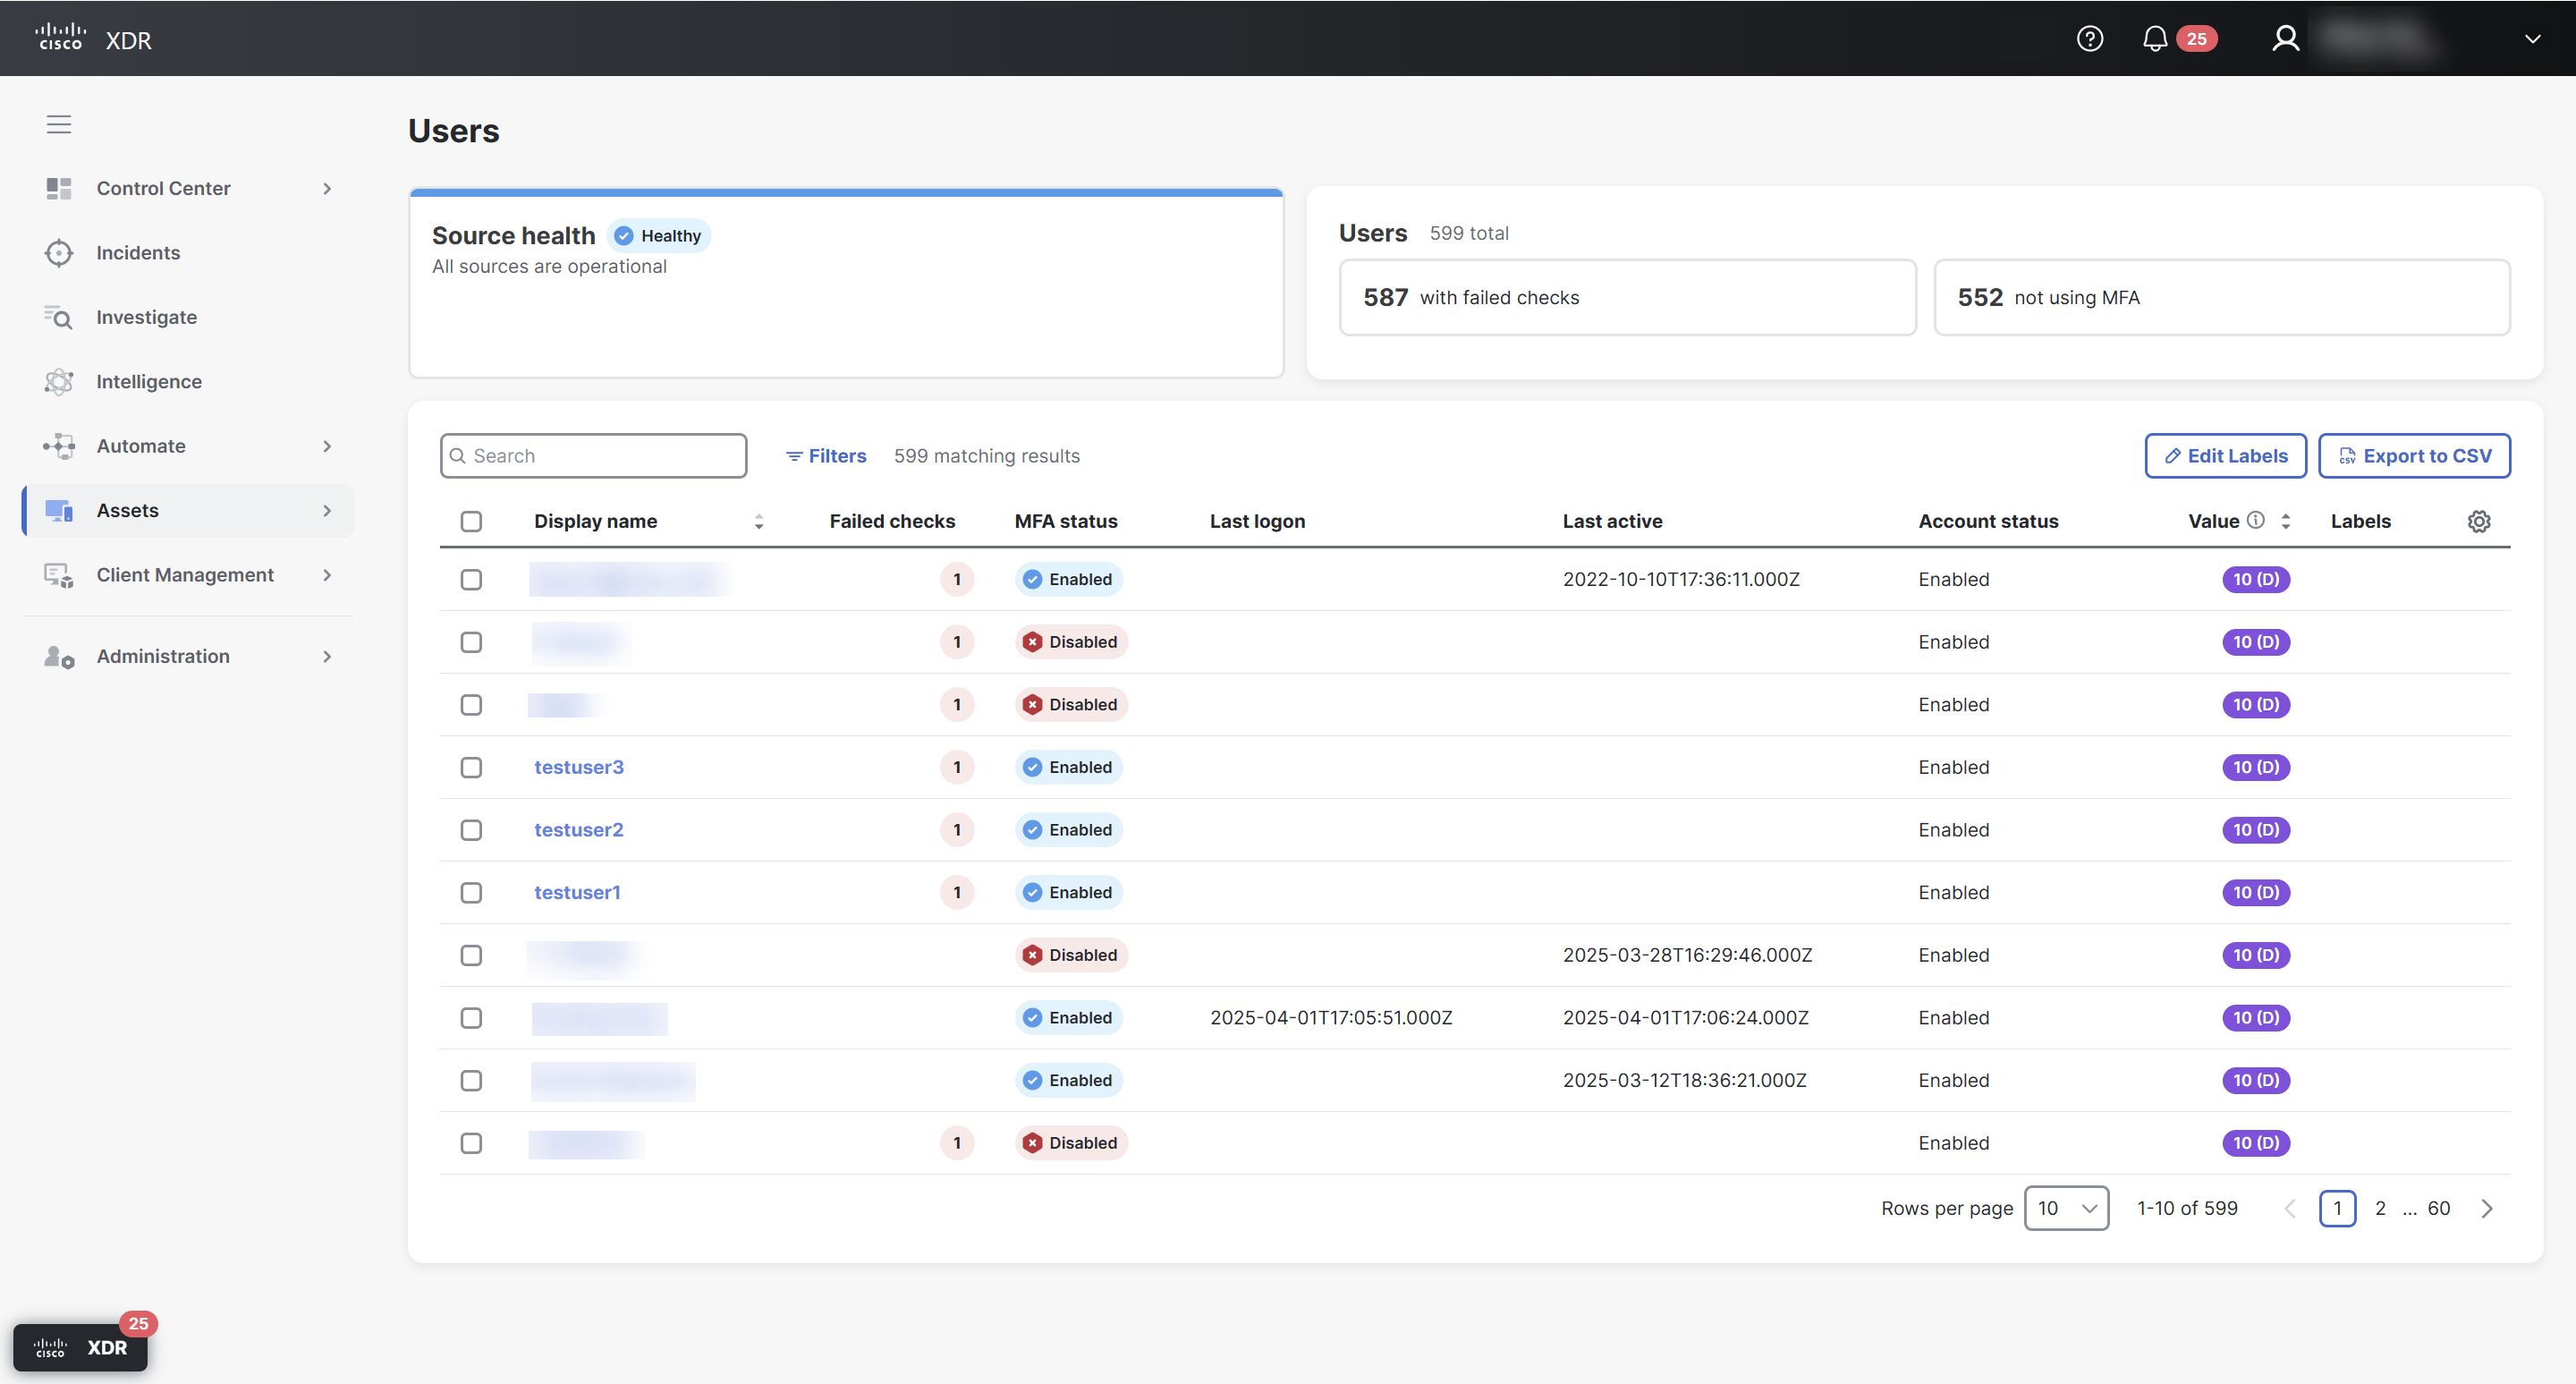
The Users page provides an overview of the users in your organization identified by Cisco Identity Intelligence in a customizable table.
Choose Assets > Users in the navigation menu to view the users table and charts.
Note: Rules are not supported for the Users page.
Various charts show you some information about your sources and users, such as:
Shows you at-a-glance the overall health and status of the Cisco Identity Intelligence integration. If there is an issue, you can pivot to the Sources page to get more information on the error.
Note: Cisco XDR does not provide the health of sources integrated with Cisco Identity Intelligence. To see if there are any issues with Cisco Identity Intelligence integrations, go to your Cisco Identity Intelligence portal or Cisco Security Cloud Control.

Displays the total number of users, users with identity events, and users not using multi-factor authentication (MFA) in your organization.

To help you find the specific users that you’re looking for, filter the users listed in the table by using the search box and the Filters drawer to select criteria in the search categories.
Use the Search box to filter the users listed in the inventory table according to the text you enter.

Note: The search box is not case-sensitive.
For example:
- Enter “demo” and Cisco XDR filters through all the user information, including display name, login names, emails, and so on. If any of the user information contains the text you entered, that user will appear in the table.
- Enter a partial search, and the table will update in real-time as you type.
Boolean Operators
You can also use the Boolean operators AND, OR, and NOT. They can make each search more precise and save you time.
For example:
- Enter “demo OR Alice” in the search box and the table shows you users that have the word “demo” in their data and users that have the word “Alice” in their data. Entering “demo Alice” generates the same result.
- Enter “demo AND Alice” in the search box and the table shows you users that have both the words “demo” and “Alice” somewhere in their data.
- Enter “NOT demo” in the search box and the table shows you users that do not have the word “demo” in their information.
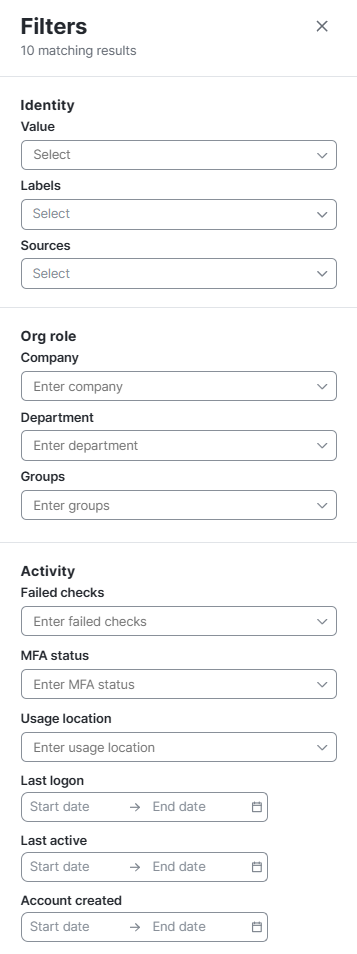
Another way to filter is to include the criteria in these search categories using the Filters drawer. Click Filters to open the drawer.
The Identity section includes the following criteria:
-
Value
You can select multiple user values and if the value is assigned by default or manually.
-
Labels
Select Must Include to include that label in your filter, or conversely Must Exclude.
-
Sources
Select Must Include to include that label in your filter, or conversely Must Exclude.
The Organization role section includes the following criteria that you can check to include them in your filter:
-
Company
-
Department
-
Groups
The Activity section includes the following criteria:
-
Identity events
Check to include the criteria in your filter.
-
MFA status
Check Enabled or Disabled to include if users are using multi-factor authentication (MFA) or are not using multi-factor authentication (MFA).
-
Usage location
Check to include the criteria in your filter.
-
Last logon
Select a start and end date to filter by the specified time range.
-
Last Active
Select a start and end date to filter by the specified time range.
-
Account created
Select a start and end date to filter by the specified time range.
Checks Across Multiple Categories
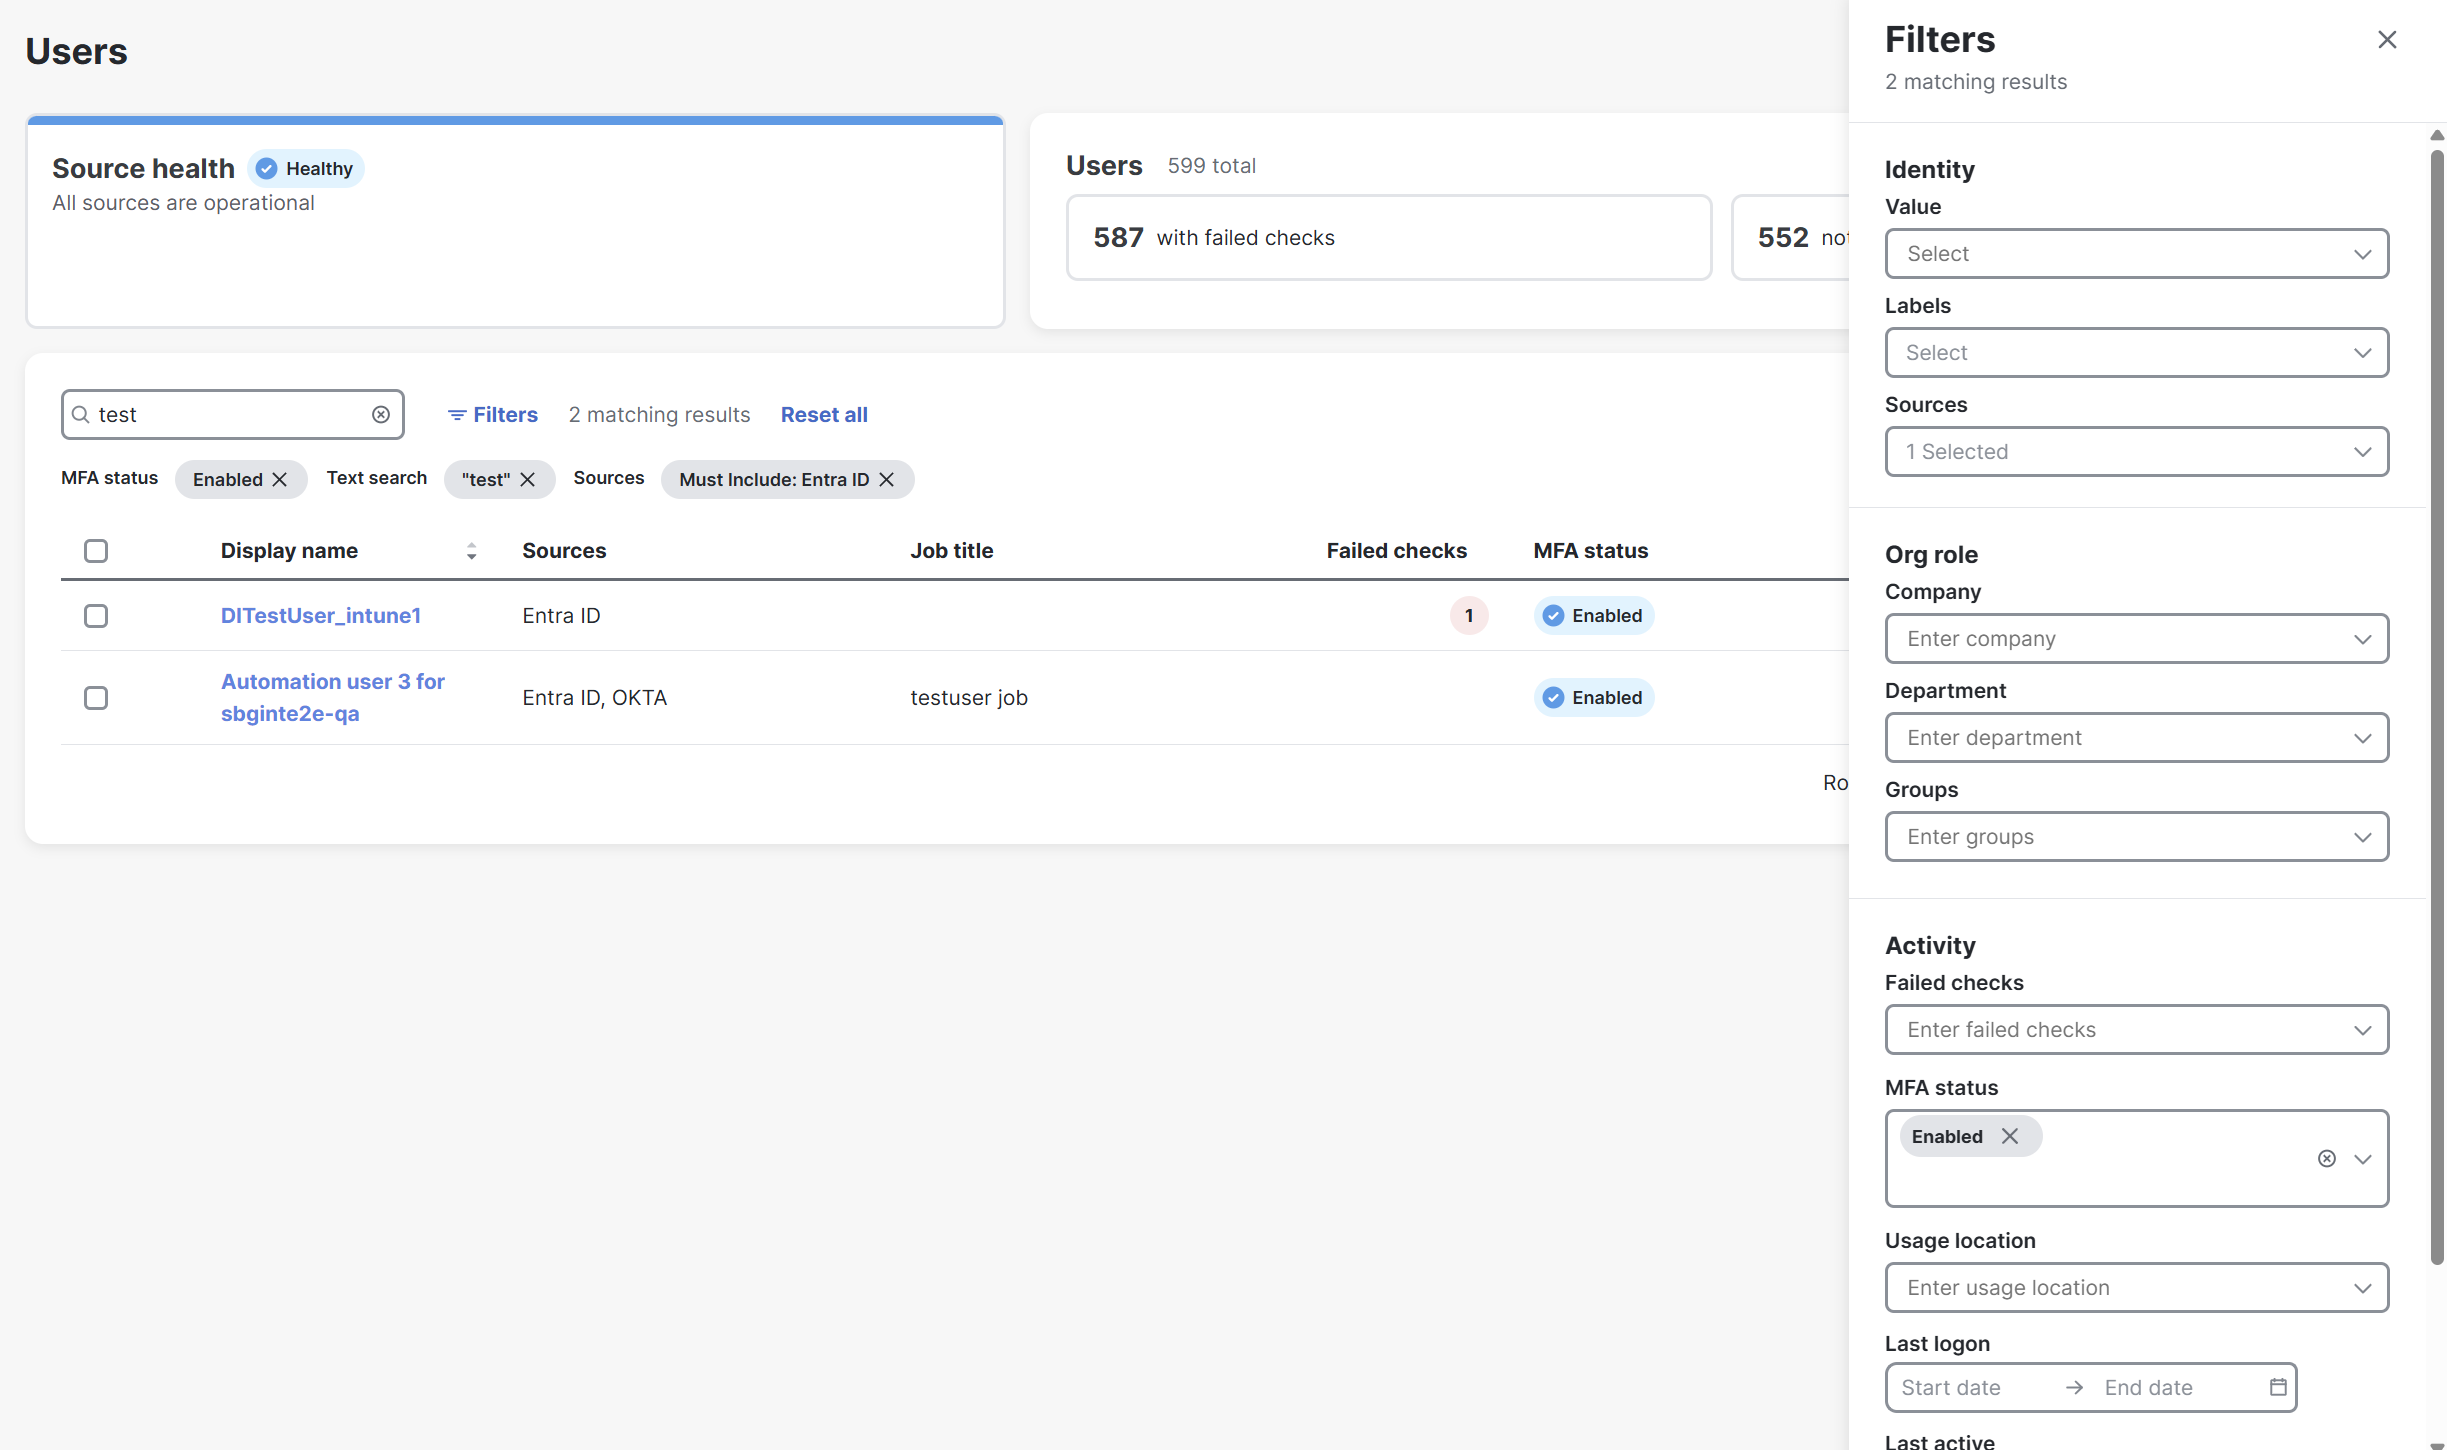
A filter with checks across multiple categories results in a Boolean AND operation. For example, this filter results in the table showing only the users that meet all the specified conditions:
-
Search
have the text “qa” somewhere in their information
-
MFA status
is Enabled
-
Sources
must include Entra ID
Checks Within a Category
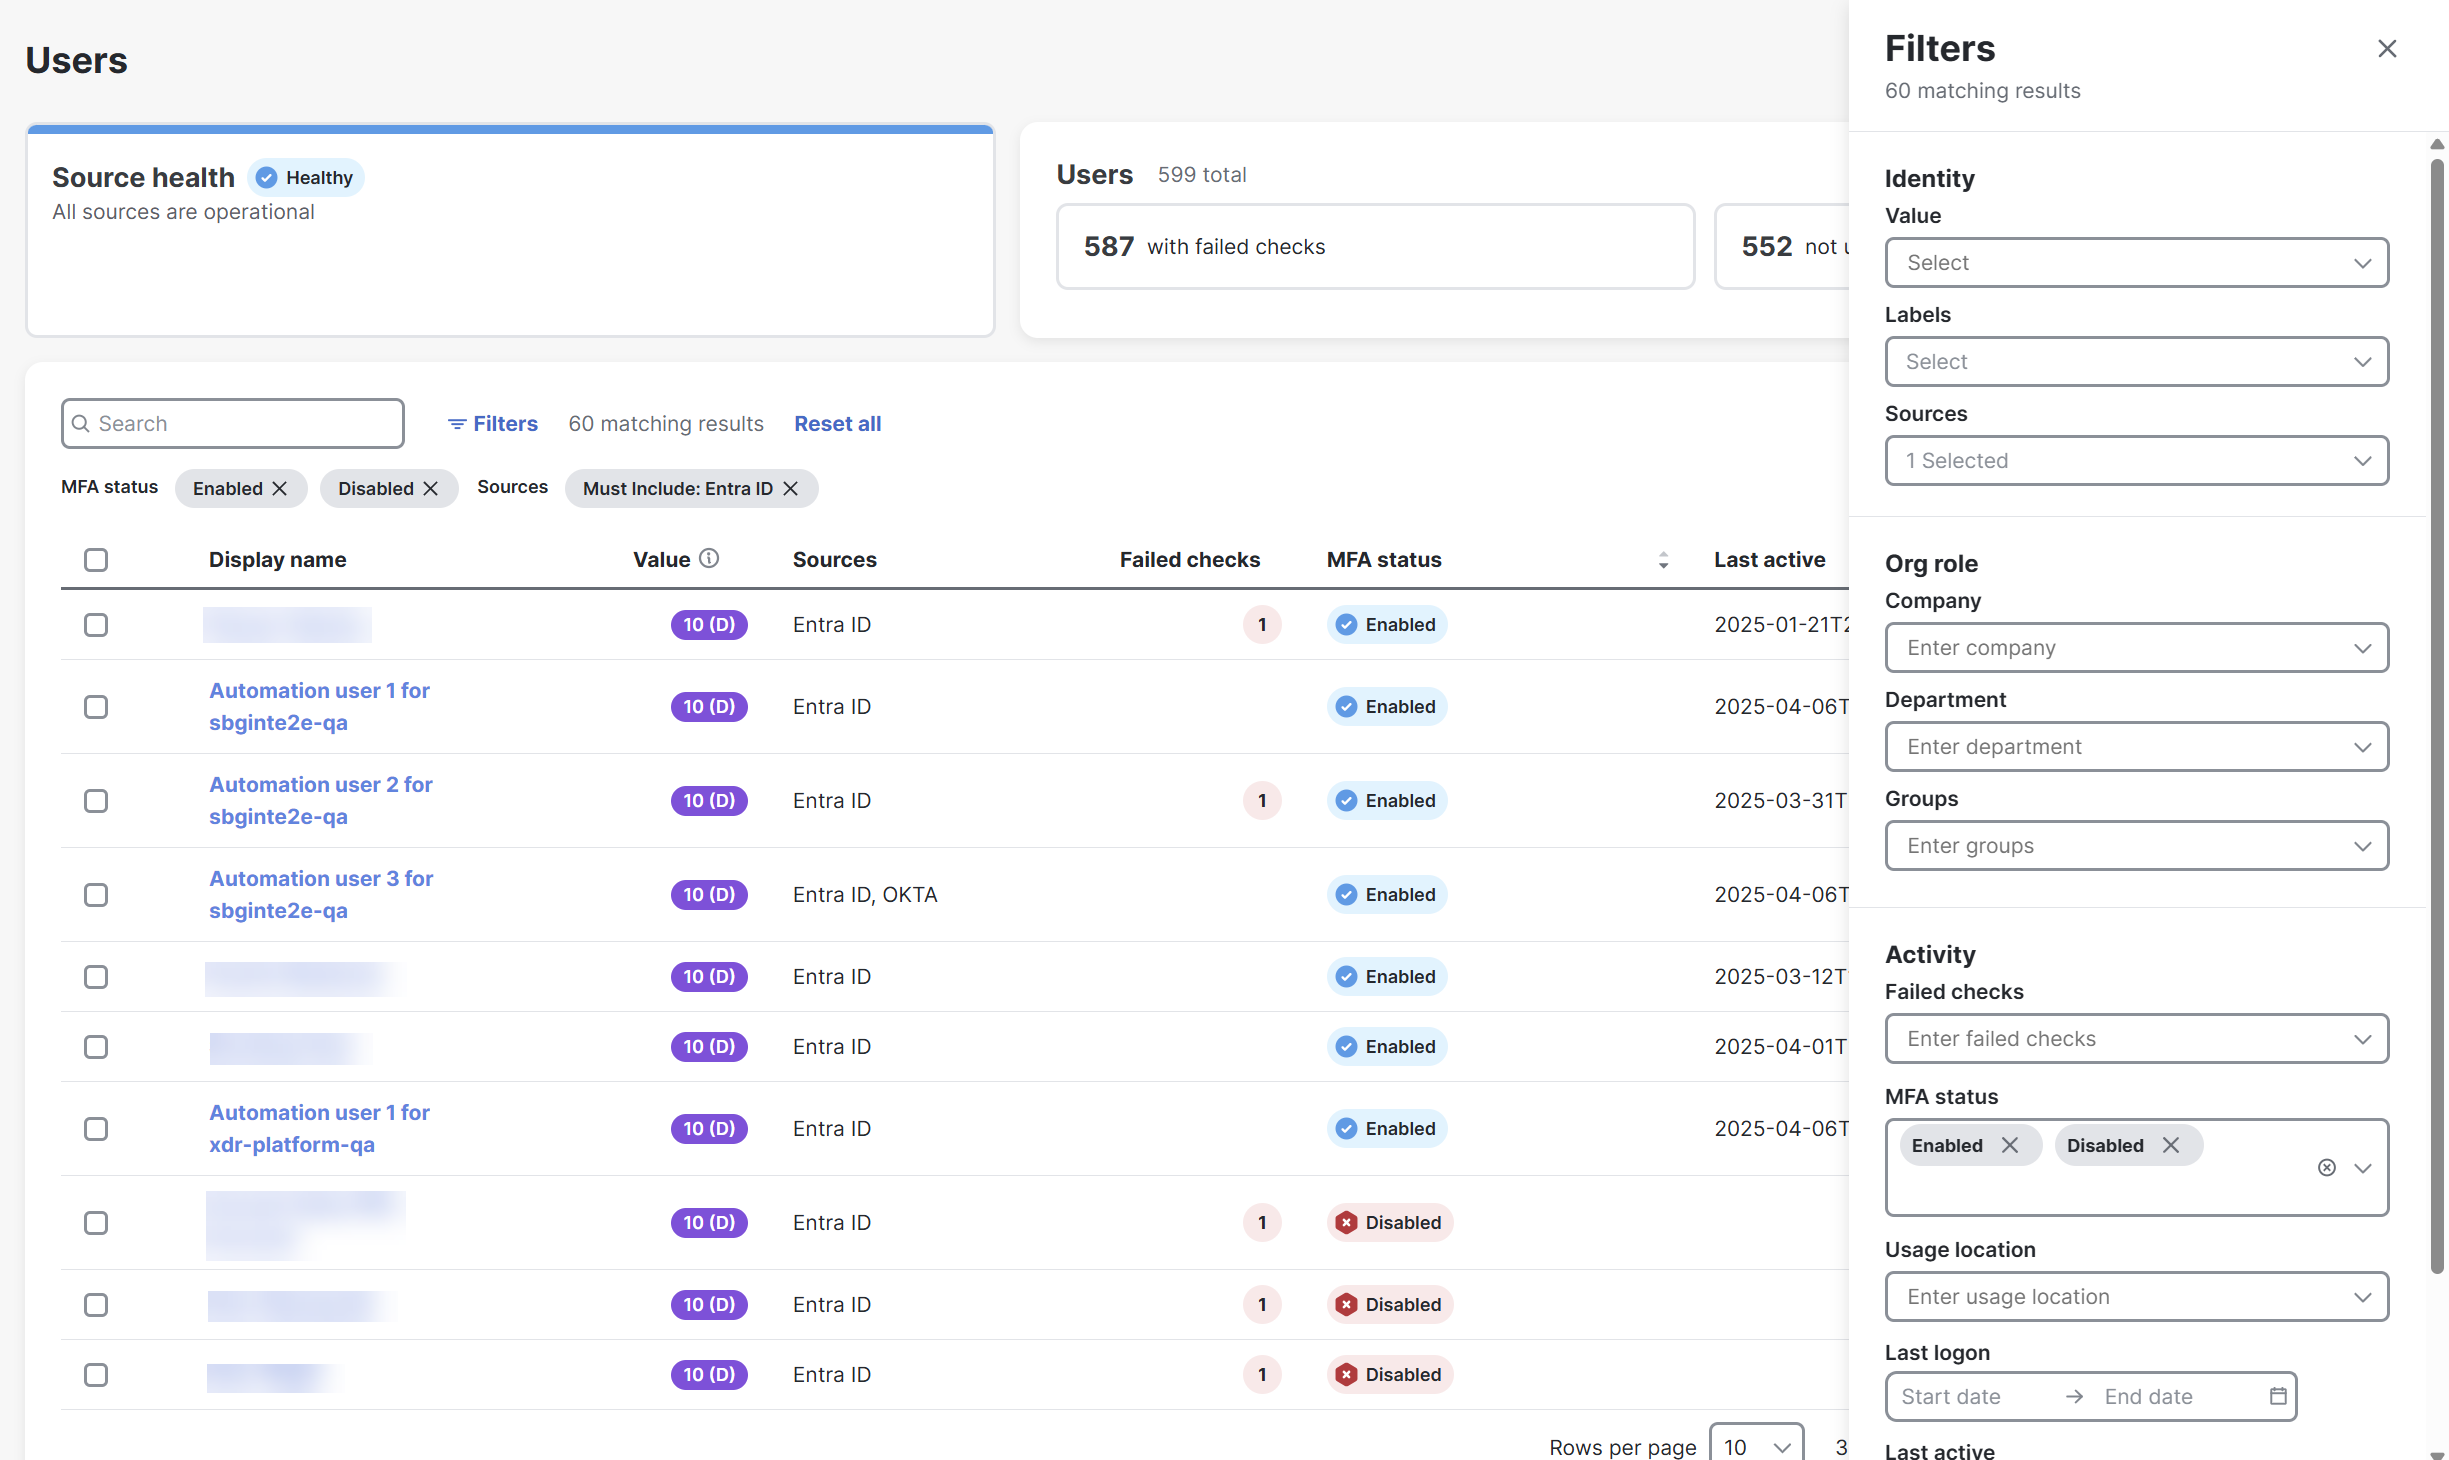
Multiple checks within the same category results in a Boolean OR operation in that category. For example, this filter results in the table showing all the users from Entra ID that have MFA enabled or disabled:
-
Sources
must include Entra ID
-
MFA status
is Enabled
-
MFA status
is Disabled
You can sort the table by a specific column and select the columns displayed to customize the table for the data you want to view.
You can scroll the list of users using the scroll bar on the page or the up and down arrow keys on your keyboard. You can also edit the number of rows shown per page at the bottom of the table.
Note: If you have a large number of users, selecting the last page of the table will cause a loading error to occur. Use filters to reduce the number of users in the table to avoid the error.
Click the (Sort) icon next to the column headers to sort the table by that column in ascending or descending order.
To reorder the table columns, click and drag a column header to the desired position in the table.
Click the ![]() (Settings) icon to open the Select columns drawer and check the check boxes next to the columns you want displayed in the table.
(Settings) icon to open the Select columns drawer and check the check boxes next to the columns you want displayed in the table.
Note: Only users with an Administrator role can create, edit, and delete labels.
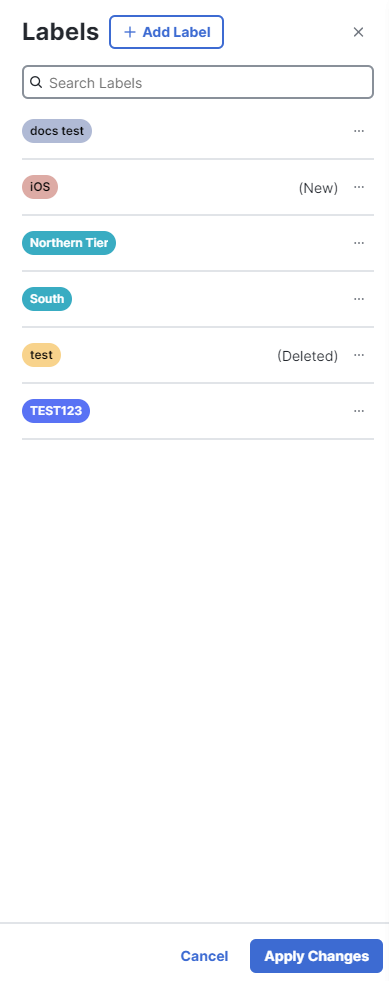
The Labels drawer allows you to manage the labels that can be assigned to your users. You can perform multiple tasks in the drawer and then click Apply Changes to confirm.
From the Labels drawer, you can perform the following tasks:
To create a label:
-
Click Edit Labels to open the drawer.
-
Click Add Label.
-
Enter a name and select a color for the new label.
-
Click the
 (Add) icon.
The new label will be added to the drawer with a (New) tag. -
Click Apply Changes to confirm all actions in the drawer.
Use the Search Labels text box at the top of the drawer to locate specific labels within the list. The labels that match your search are displayed in the drawer.
To edit a label:
-
Click Edit Labels to open the drawer.
-
Click the
 (Ellipsis) icon to open the Options menu.
 -
Choose Edit.
-
Update the label name or color.
-
Click Apply Changes to confirm all actions in the drawer.
To delete a label:
-
Click Edit Labels to open the drawer.
-
Click the
 (Ellipsis) icon to open the Options menu.
 -
Choose Delete.
The label will have a (Deleted) tag in the drawer. -
Click Apply Changes.
-
Click Delete to confirm.
Note: Deleting a label will remove it from all assigned users.
Note: Only users with an Administrator role can download a CSV.
Click Download CSV to download the table to a spreadsheet file. The file only includes the users and data in the current table, and if applicable, rows in additional table pages.
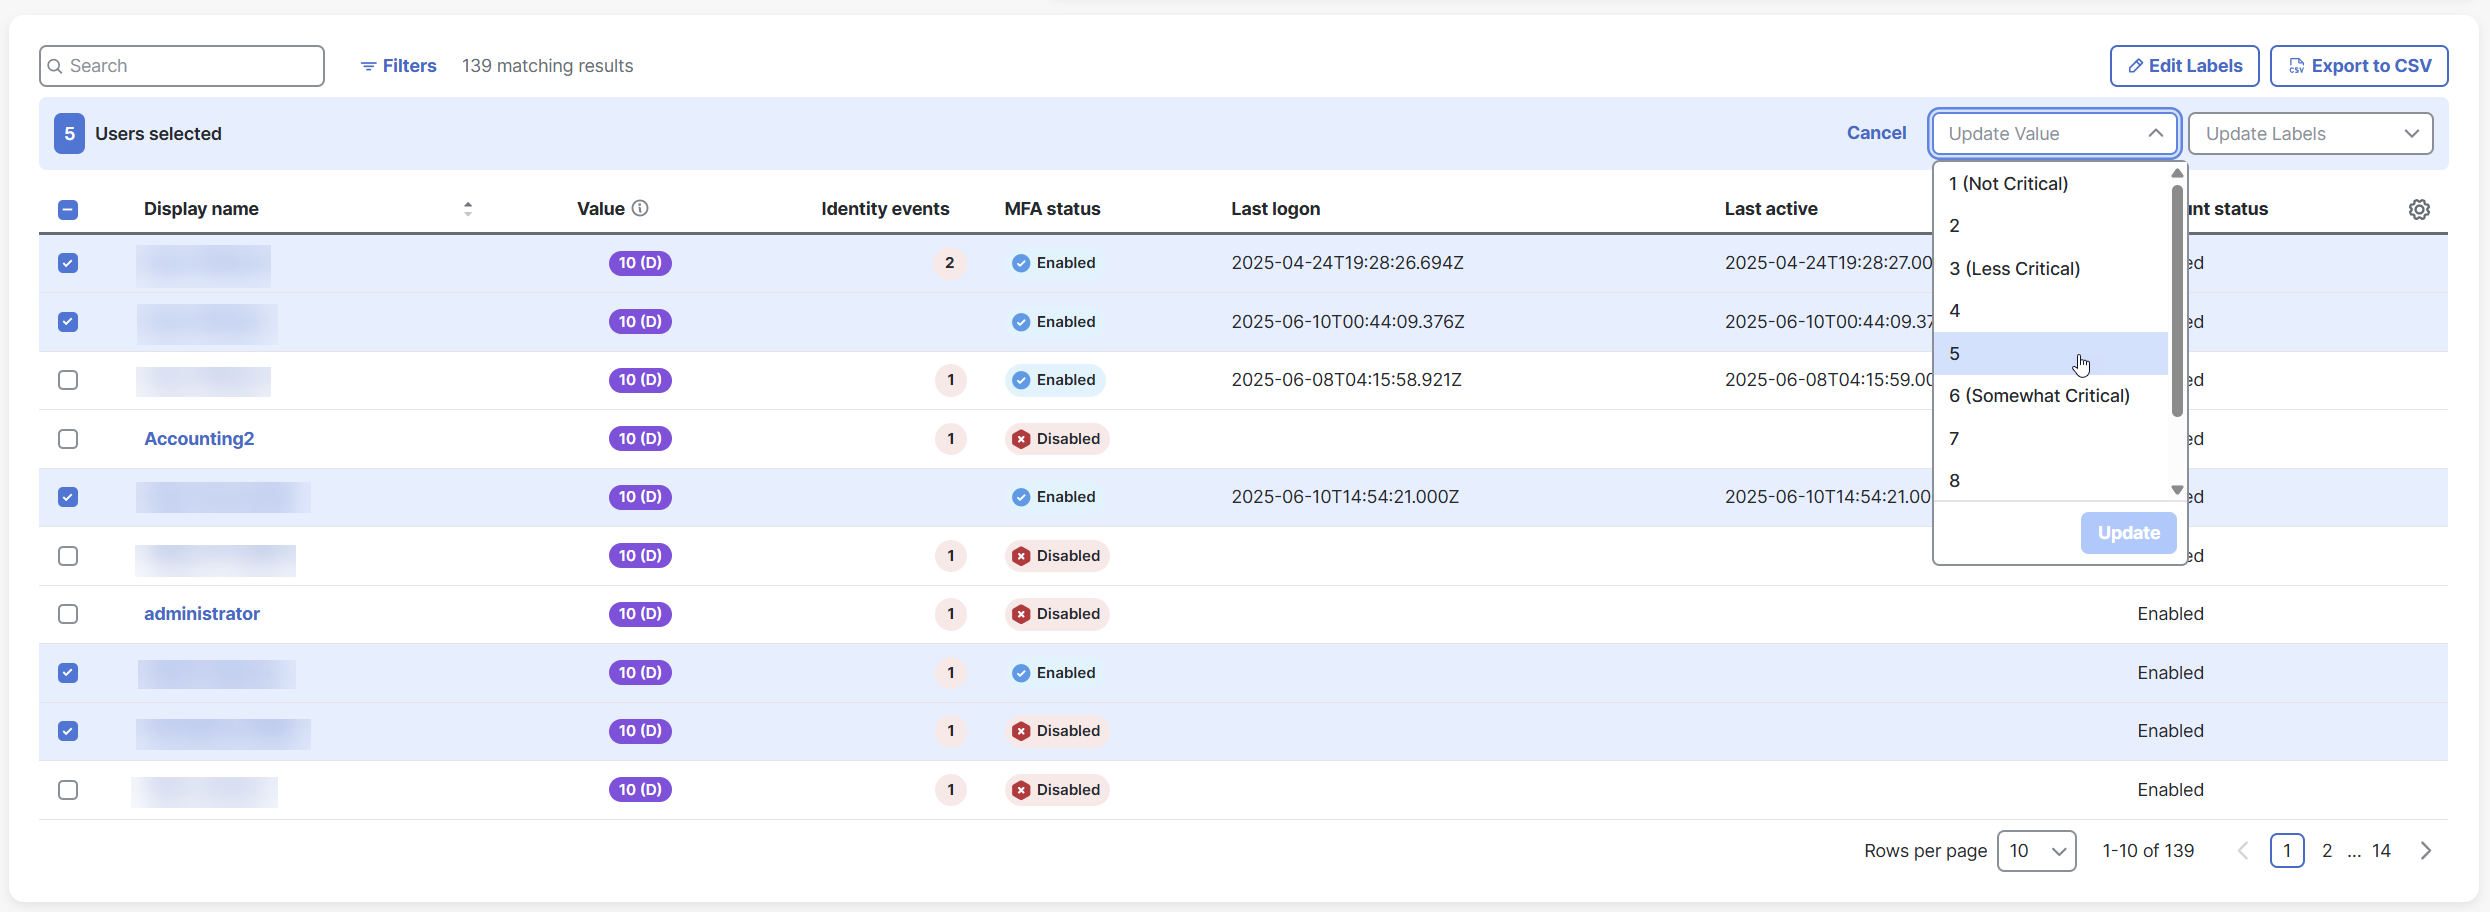
The User Value can be set from 1-10, where 1 is the least critical and 10 is the most critical. Users with an Administrator role can update the value in the Users table or on the User Details page.
To update the values for one or more users:
Note: Only users with an Administrator role can update labels.
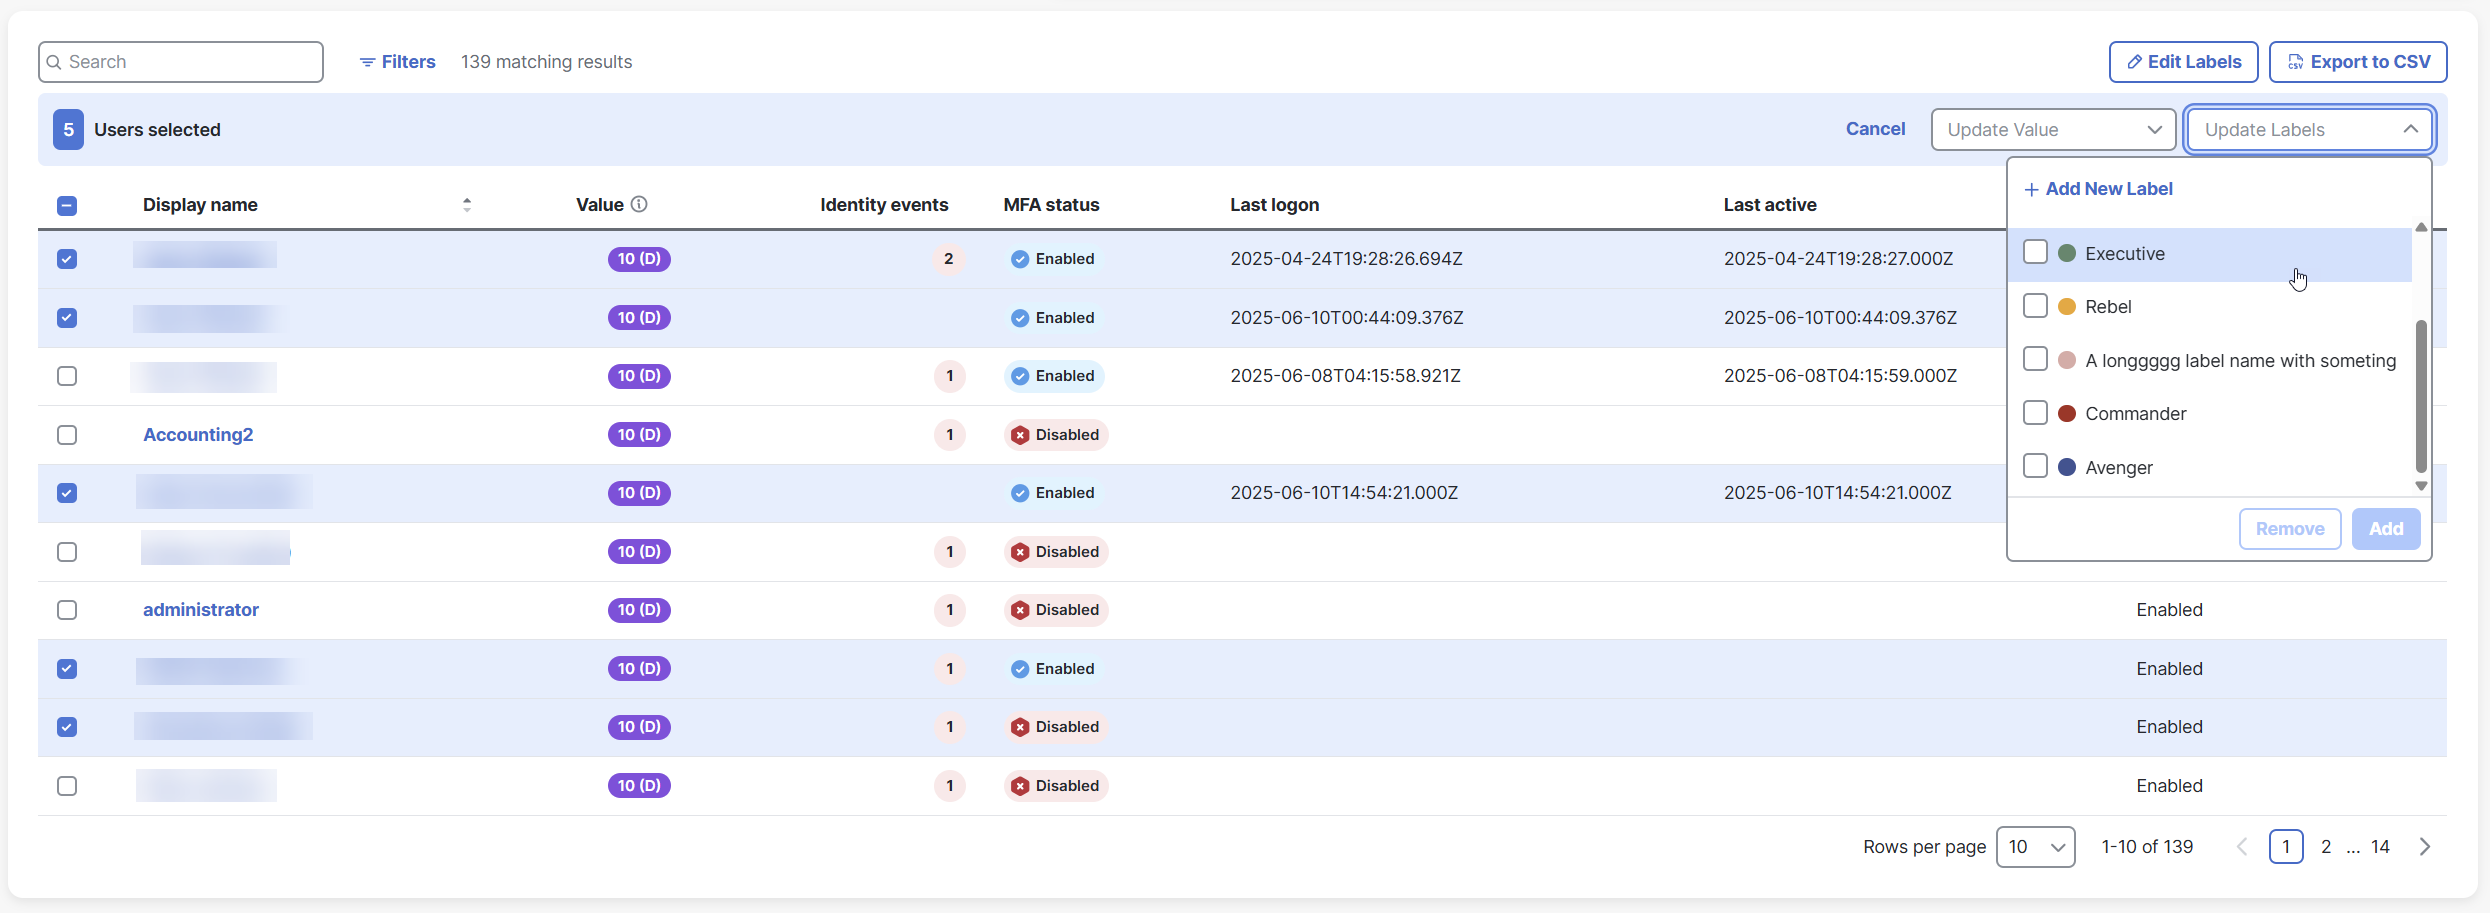
You can update labels for one or more users at a time using the bulk action bar.
To update the labels for one or more users:
-
Check the check boxes next to the users you want to update.
-
Click the Update Labels drop-down menu in the bulk action bar and choose the labels you want to remove.
-
Click Remove.
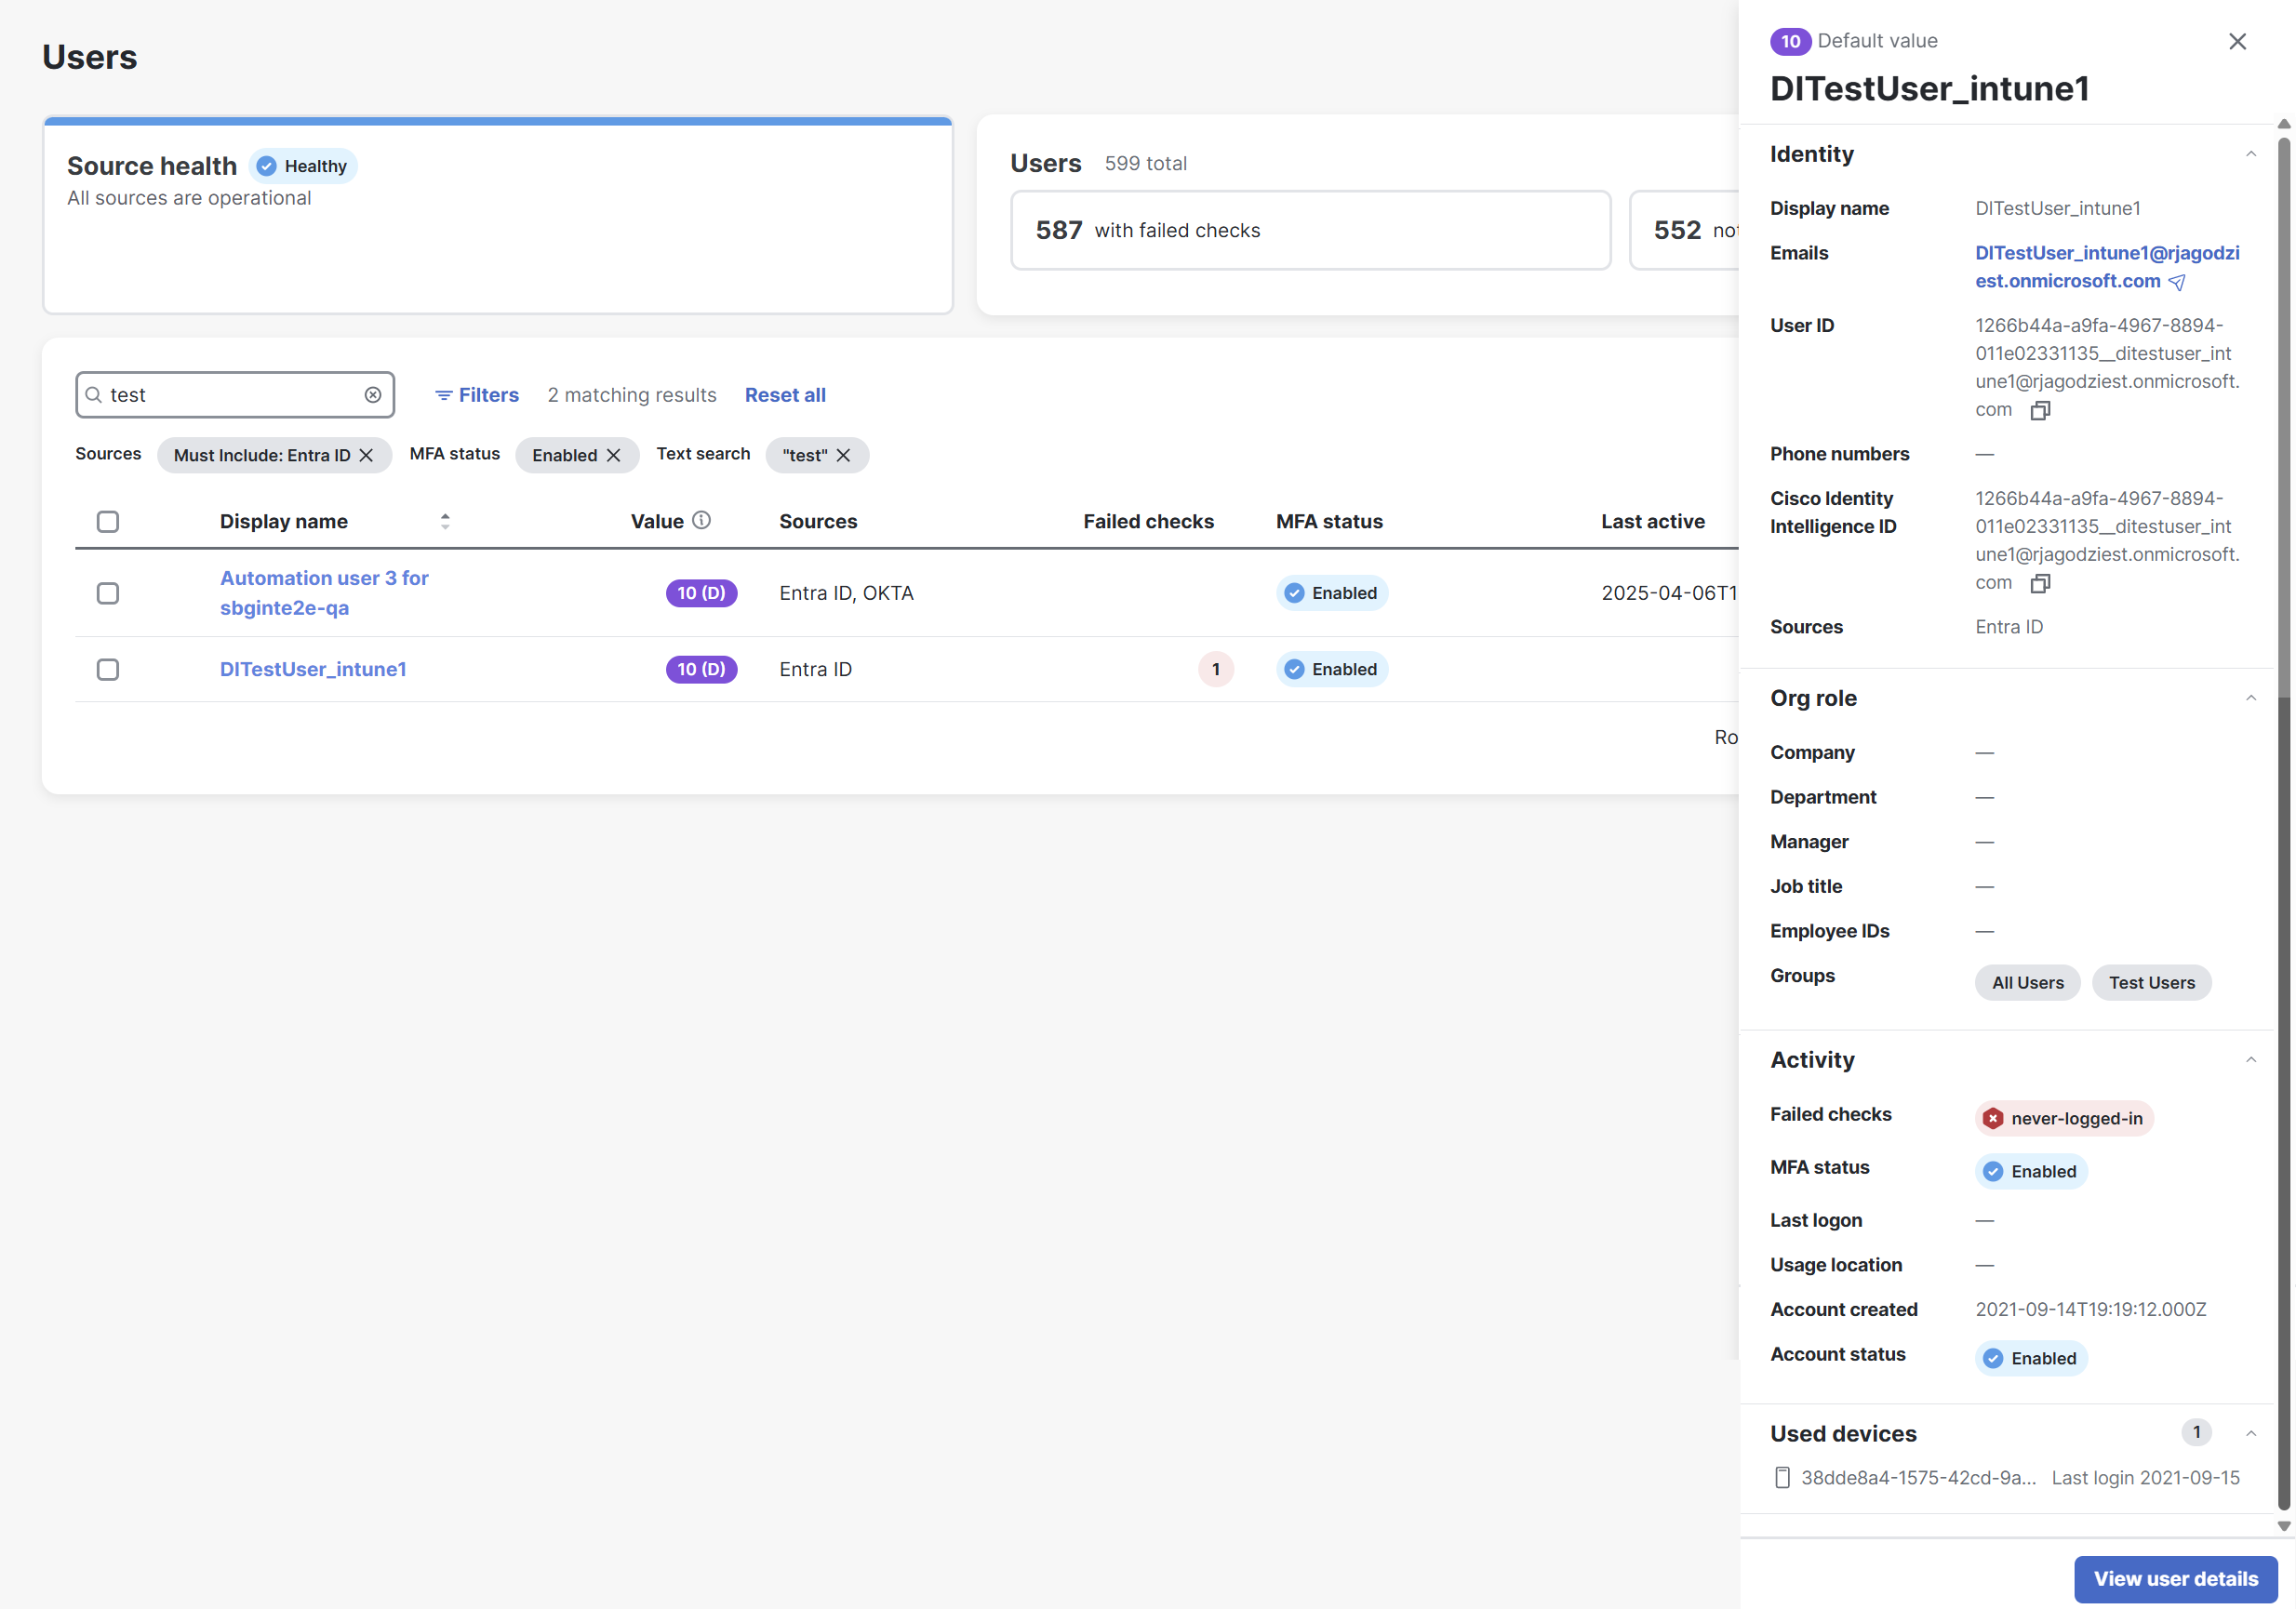
Click a Display name to open the User Details drawer.
The User Details drawer shows the following information about the user:
|
Value |
The value assigned to the user and whether the value was assigned by manually or by default. |
|
Labels |
Shows all of the labels assigned to the user. If the label was manually assigned, you can click the X (Remove) icon to remove the label from the user. |
|
Display name |
The user's display name. |
|
Login names |
Login names associated with the user. |
|
Emails |
Emails associated with the user. |
|
User ID |
The User ID assigned to the user. Click the |
|
Phone numbers |
Phone numbers associated with the user. |
|
Sources |
Which Cisco Identity Intelligence sources provided the user data. |
|
Company |
The company associated with the user. |
|
Department |
The user's department. |
|
Manager |
The name of the user's manager. |
|
Job title |
The user's job title. |
|
Employee IDs |
The user's employee ID. |
|
Groups |
Groups assigned to the user imported from Cisco Identity Intelligence. |
|
Identity events |
The list of any failed checks for the user. |
|
MFA status |
If the user has multi-factor authentication enabled or disabled. |
|
Last logon |
Date the user last logged into your organization. |
|
Usage location |
Location the user was last seen. |
|
Account created |
Date the user was first seen. |
|
Account status |
If the user is enabled or disabled in your organization. |
|
Used devices |
Devices used by the user and date the device was last seen. Click on a device to expand the Device Details drawer. For more information about what is displayed in the drawer, see View Summary of Device Details in Drawer. Cisco XDR provides correlation based on email address and may display used devices from additional integrated sources. |
View User Details
To view more information about the user, click View user details in the lower portion of the drawer to open the User Details page. For more information, see the User Details help topic.
