GitHub Repositories
To use the content in our GitHub repositories, you must have them configured in Automation. These repositories are typically configured by default; if they are not configured in your tenant, use the instructions below to configure them.
Perform the following steps to add a Git repository for atomic actions to your tenant.
-
Choose Automate > Advanced in the navigation menu.
-
Click the Git Repositories tab.
-
Click the New Git Repository button on the right (or click the Display name of an existing repository to update).
-
On the New Git Repository page, in the General area, enter a Display Name for the repository.
-
In the Account Keys area, click the No Account Keys drop-down menu and choose True.
Note: You may see a 403 Forbidden error when importing content from GitHub. Some of the repositories we configure for you are created without credentials. Unauthenticated API requests to GitHub are rate-limited so, if you want to avoid this, you can update the repository configurations with an account key using the procedure in the Add Account Key section below.
-
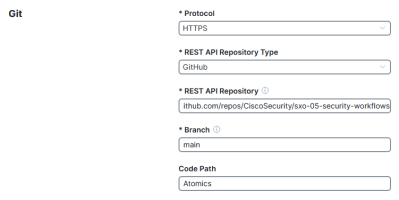
In the Git area, enter the Git information:
-
Click Submit.
When the operation completes, you will see a green success message at the top of the page.

Perform the following steps to add a workflows repository to your tenant.
-
Choose Automate > Advanced in the navigation menu.
-
Click Git Repositories.
-
Click New Git Repository (or click the existing repository that you want to update).
-
On the Add Git Repository page, in the General area, enter a Display Name for the repository.
-
In the Account Keys area, click the No Account Keys drop-down menu and choose True.
Note: You may see a 403 Forbidden error when importing content from GitHub. Some of the repositories we configure for you are created without credentials. Unauthenticated API requests to GitHub are rate-limited so, if you want to avoid this, you can update the repository configurations with an account key using the procedure in Add Account Key section below.
-
In the Git area, enter the Git information:
- Protocol: HTTPS
- REST API Repository Type: GitHub
- REST API Repository: api.github.com/repos/CiscoSecurity/sxo-05-security-workflows
- Branch: Main
- Code Path: Workflows
-
Click Submit.
When the operation completes, you will see a green success message at the top of the page.
-
Choose Automate > Advanced in the navigation menu.
-
Click Git Repositories.
-
Click New Git Repository (or click the existing repository that you want to update).
-
On the Add Git Repository page, in the General area, enter a Display Name for the repository.
-
In the Account Keys area, click the No Account Keys drop-down menu and choose True.
Note: You may see a 403 Forbidden error when importing content from GitHub. Some of the repositories we configure for you are created without credentials. Unauthenticated API requests to GitHub are rate-limited so, if you want to avoid this, you can update the repository configurations with an account key using the procedure in the Add Account Key section below.
-
In the Git area, enter the Git information:
- Protocol: HTTPS
- REST API Repository Type: GitHub
- REST API Repository: api.github.com/repos/CiscoSecurity/sxo-05-security-workflows
- Branch: Main
- Code Path: Workflows-Default
-
Click Submit.
When the operation completes, you will see a green success message at the top of the page.
Add an account key if you use any repositories that require authentication, or receive a 403 Forbidden error when importing content from GitHub. Perform the following steps to add an account key to any of your Git repositories.
Note: If your GitHub account has two-factor authentication enabled, you must use a personal access token. To generate a token, see the GitHub instructions.
-
Create a new Git repository using one of the methods above.
-
Choose Automate > Account Keys in the navigation menu.
-
Click New Account Key on the right.
-
On the New Account Key page, in the Account Key Type area, click the Account Key Type drop-down menu and then choose Git Password-Based Credentials.
-
In the General area, enter a Display Name.
-
In the Git area, enter your GitHub username and password.
Note: If you have a personal access token, enter the token instead of your password.
-
Click Submit.
When the operation completes, you will see a green success message at the top of the page.
-
In the left navigation menu, click Admin.
-
Click the Display name of the repository you want to use the account key with and perform the following steps:
- In the Account Keys area, click the No Account Keys drop-down menu and choose False.
- Click the Default Account Keys drop-down menu and choose the account key you created.
- Click Submit.
When the operation completes, you will see a green success message at the top of the page.
Repeat these steps to add account keys to any additional repositories you want to use them with.
- In the Account Keys area, click the No Account Keys drop-down menu and choose False.


