Calendars
Calendars define a collection of days and times when a schedule should be executed. Automation has various out-of-box calendars for common U.S. holidays and often-used time frames such as daily or weekly.
When a calendar and schedule are combined, they can be used to trigger a workflow on pre-defined days and times. A calendar defines a collection of days and a schedule defines the frequency within a given day. For example, a calendar would specify that a workflow runs every Thursday, and the schedule would specify that the workflow runs every hour.
The available calendar types are:
- Date list calendar - Configure a specific list of dates to associate with the calendar.
- Group calendar - Combine dates from multiple calendars that already exist on the system. You can also specify additional dates to include and exclude.
- Recurring calendar - Configure a time frame with repeating days.
- Time range calendar - Configure a time frame with repeating days and time ranges.
From the Calendars tab, you can create, modify, and perform other actions. To modify an existing calendar, click the name of the calendar. Other actions are available from the Actions column. Actions include Used By to see workflows that use a specific calendar and Delete to remove a calendar.
The maximum number of calendars allowed is 100 per organization.
Note: Out-of-box calendars cannot be modified or removed.
A date list calendar is a collection of specific dates. You must add each individual date as a separate entry.
To create a date list calendar:
- Choose Automate > Triggers in the navigation menu
- On the Calendars tab, click New Calendar.
- In the Calendar Type drop-down list, choose Date List Calendar.
- In the General section, enter a Display Name and optional Description.
- In the Dates section, click the calendar icon and select a month, day, and year. The selected dates must be in the future.
- If you want to add additional dates, click Add Date and select more.
- Click Submit.
A group calendar allows you to combine multiple calendars. For example, if you want a workflow to run every Monday and every Friday, you could create a group calendar that combines the Every Monday calendar with the Every Friday calendar. You can also exclude a calendar from a group if you want to skip specific days like holidays.
To create a group calendar:
- Choose Automate > Triggers in the navigation menu
- On the Calendars tab, click New Calendar.
- In the Calendar Type drop-down list, choose Group Calendar.
- In the General section, enter a Display Name and optional Description.
- In the Group Calendars section, click the calendar icons to select Starts (required) and Ends (optional) dates for the calendar. The calendar will go into effect on the Starts date and stop running on the Ends date.
- Click the Includes Dates from Following Calendars drop-down list and choose one or more calendars to include in the group calendar.
- If you want to exclude certain dates, click the Excludes Dates from Following Calendars drop-down list and choose one or more calendars to exclude. This can be used to exclude holidays, for example.
- Click Submit.
Example of a group calendar that will run every Monday and Friday in December, excluding any holidays:

Recurring calendars allow you to define a start date, end date, and repetition interval between those dates. For example, you could create a calendar that runs daily, weekly, monthly, or yearly. Within each of those interval types, you can specify more details such as which days of the week you want to use if running weekly.
To create a recurring calendar:
- Choose Automate > Triggers in the navigation menu
- On the Calendars tab, click New Calendar.
- In the Calendar Type drop-down list, choose Recurring Calendar.
- In the General section, enter a Display Name and optional Description.
- In the Recurring section, click the calendar icons to select Starts (required) and Ends (optional) dates for the calendar. The calendar will go into effect on the Starts date and stop running on the Ends date.
- Click the Repeats drop-down list and choose how often you want the calendar to repeat. Depending on which interval you choose, you will see different options:
- Daily - Type or use the arrows to set the number of days between executions.
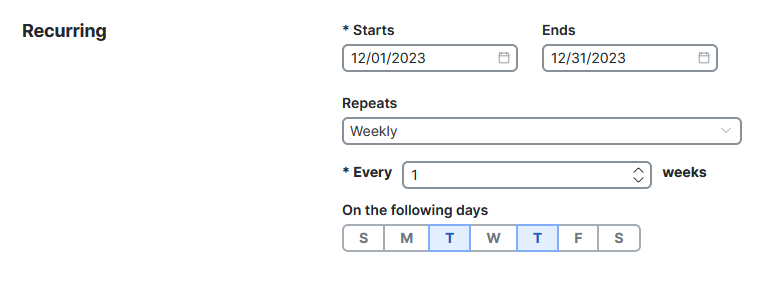
- Weekly - Type or use the arrows to set the number of weeks between executions then click the days of the week you want to include.
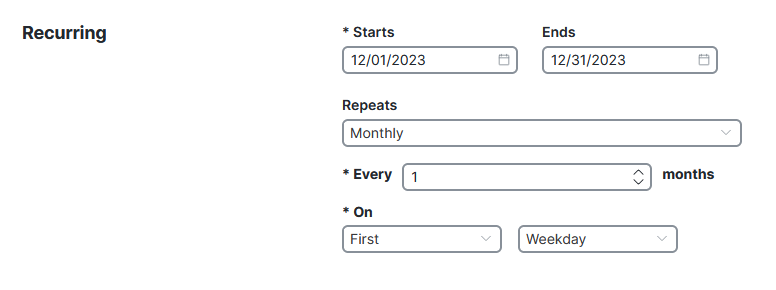
- Monthly - Type or use the arrows to set the number of months between executions then use the On drop-down list to select which days of the month you want to include.
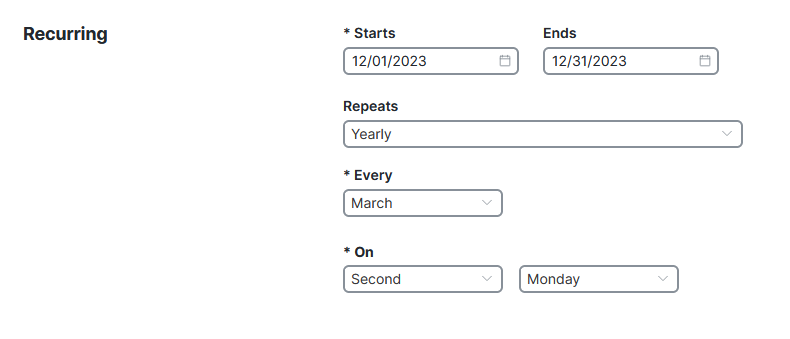
- Yearly - Type or use the arrows to set the number of years you want between executions then use the Every drop-down list to choose which month and the On drop-down list to choose the days within that month.
- Click Submit.
Examples of recurring calendars to help you understand how to configure various intervals:
Daily
This calendar executes every other day in December:

Weekly
This calendar executes every week on Tuesdays and Thursdays in December:

Monthly
This calendar executes every month on the first weekday, February through December:

Yearly
This calendar executes every March on the second Monday. This is configured for February through December of the same year, so this would only run once this March. When using a yearly calendar, you will likely want a much longer period of time.

A time range calendar is a window of time that covers recurring days of the week and time ranges on those days.
To create a time range calendar:
- Choose Automate > Triggers in the navigation menu
- On the Calendars tab, click New Calendar.
- In the Calendar Type drop-down list, choose Time Range Calendar.
- In the General section, enter a Display Name and optional Description.
- In the Recurring section, click the calendar icons to select Starts (required) and Ends (optional) dates for the time frame. The calendar will go into effect on the Starts date and stop running on the Ends date.
- Select your Timezone.
- Under Repeats, check the day(s) of the week and specify the start and end times during which the calendar repeats within the time frame (Step 5).
- Click Submit.