Upload File
This activity allows you to upload a file to an HTTP-based target. The file must be from an activity that returns a File Path variable. For example, you could download a file from one server using the Download File activity and upload it to a different server using this activity.
Specifying a Payload
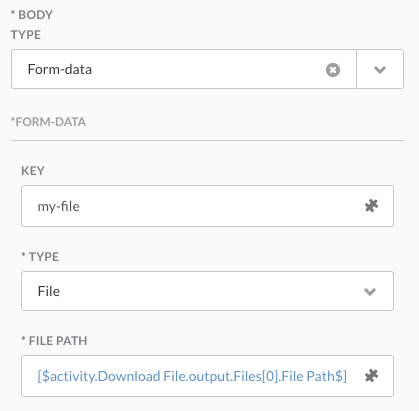
This activity allows you to upload a file as either Form-Data or Binary-Data. After configuring the activity similarly to a standard HTTP request, you must specify the file or text payload and how it should be sent. The following example shows how to upload a file that was previously downloaded using the Download File activity:

Usage
This activity functions similarly to the HTTP Request activity.
Complete the following properties to use this activity:
-
HTTP Request - Specify the following information or click the Variable Reference icon to choose a variable:
- Relative URL - Enter the relative URL for the requested resource (example: /xyz.html).
- Method - Click the drop-down menu and choose the method to interact with the HTTP endpoint. For file downloads, this will most commonly be POST (required).
- Request Body - Click the drop-down menu and select Form-Data or Binary-Data depending on the file type, then complete the properties for that data type (required):
- Form-Data - Click Add and specify the following information or click the Variable Reference icon to choose a variable:
- Key - Enter the key value associated with the request.
- Type - Click the drop-down menu and choose File or Text (required).
- File Path - Enter the path where the file will be uploaded (required).
- Binary-Data:
- File Path - Enter the path where the file will be uploaded (required)
- Form-Data - Click Add and specify the following information or click the Variable Reference icon to choose a variable:
- Content Type - Enter the content type only if the body type is Binary-Data. This field is overwritten if the body type is Form-Data.
-
Accept - Enter the MIME type for the Accept header.
-
User-Agent - Enter any applicable information for the User-Agent header.
-
Custom Headers - To include custom headers, click Add and enter the Header and Value.
-
Cookie - Click Add and enter any applicable information for the cookie header.
-
Allow Auto Redirect - Check the check box to allow auto-redirects.
-
Allow Sensitive Headers Redirect - Check the check box to allow redirects for sensitive headers such as “Authorization”, “WWW-Authenticate”, “Cookie”, or “Cookie2”. This property allows Automation to pass the authorization along with the redirect.
